Table of Contents
Equipboard
Equipboard is the world's largest community of artists and their gear. Read our review process.
We are reader-supported. When you buy through links on our site, we may earn an affiliate commission. Learn more.
Picture this: you're jamming with friends, the rhythm guitarist starts a progression, and you want to jump in with a solo. But instead of flowing freely across the neck, you find yourself stuck in that same old box around the 12th fret, playing the same licks you've been recycling for months. Sound familiar?
This is what I call the fretboard prison. You know your pentatonic scales, you can play your open chords, but somehow the guitar neck still feels like a mystery wrapped in six strings. The good news? You already own the key to your escape: that looper pedal sitting on your pedalboard.
Most guitarists think of loopers as songwriting tools or performance gadgets. But here's the secret: your looper is actually the most effective practice partner you never knew you had. When combined with the CAGED system (the ultimate roadmap of the guitar neck), it transforms dry theory into muscle memory and turns boring scale practice into engaging musical conversations.
This isn't another theoretical deep dive that leaves you more confused than when you started. This is a practical workshop that will finally connect those mysterious dots across your fretboard.
The CAGED System in 60 Seconds (The Map)
The CAGED system gets its name from five basic open chord shapes: C, A, G, E, and D. But here's where most explanations go wrong. We're not just talking about those beginner chords you learned in your first month of playing. We're talking about using these shapes as movable frameworks that work anywhere on the neck.
Think of it like this: when you play an open G chord, you're using a specific finger pattern. Now imagine taking that exact same finger pattern and sliding it up the neck. The shape stays the same, but the chord changes. That's the magic of the CAGED system.
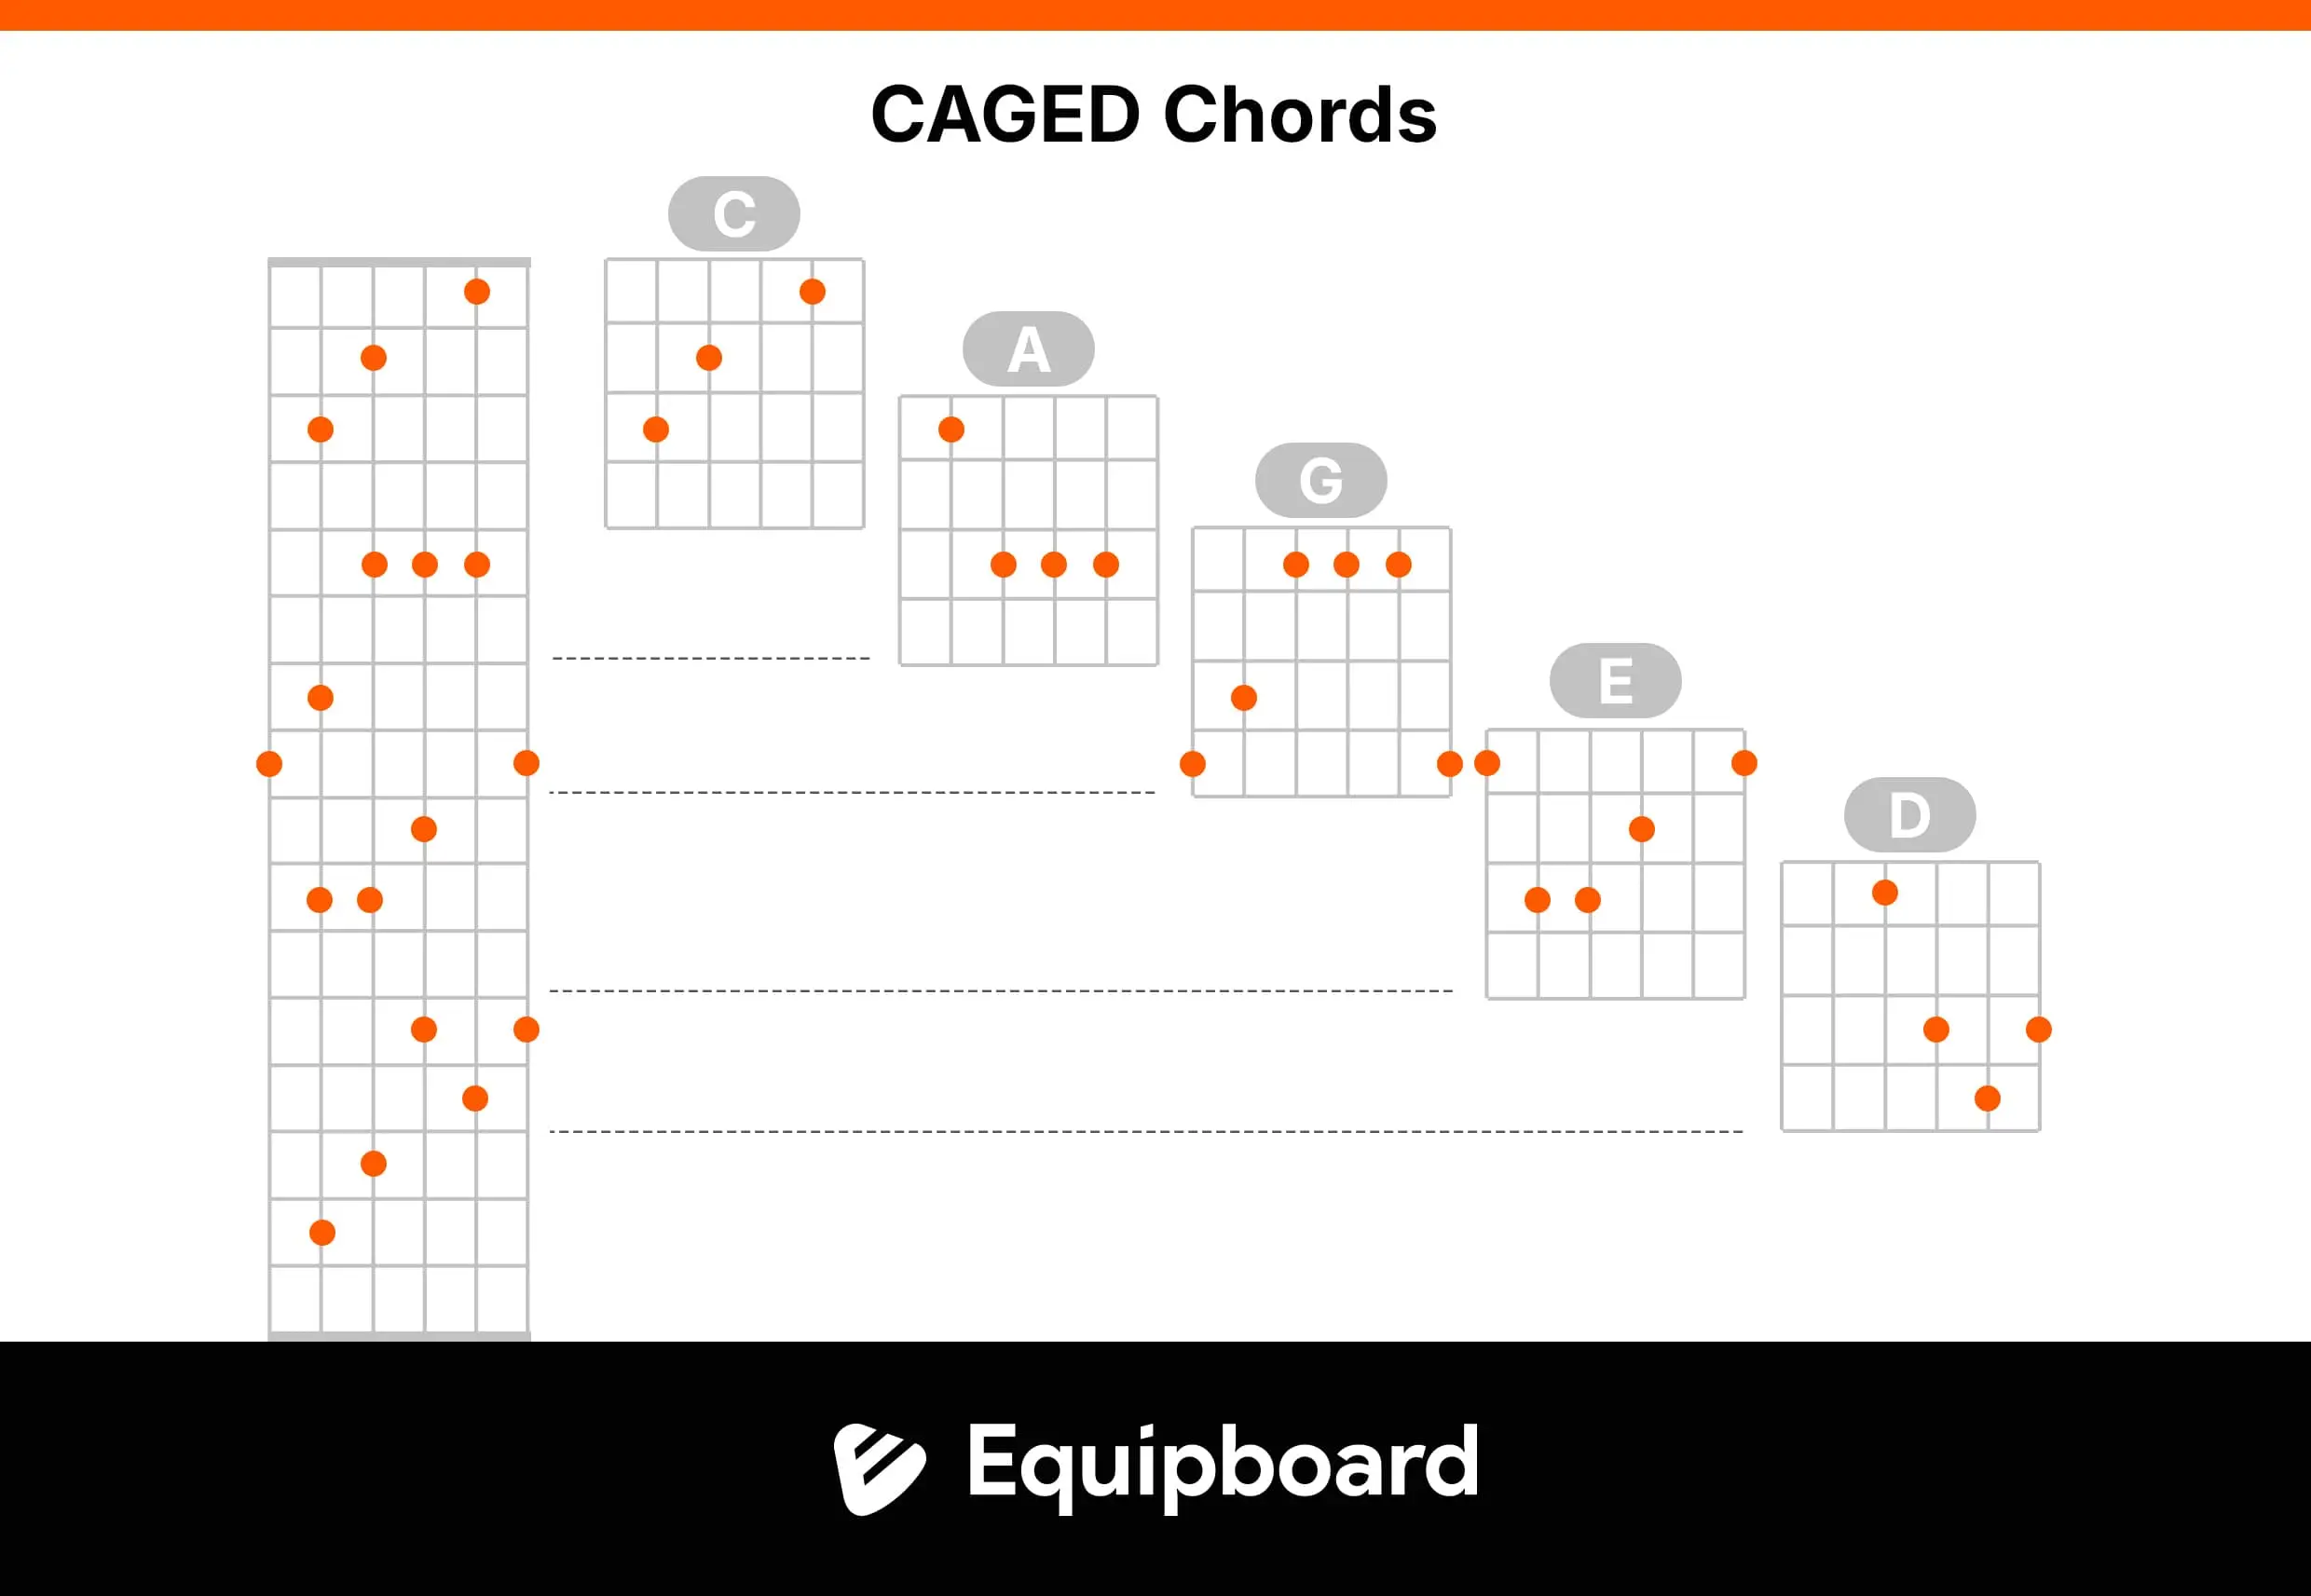
The Five Essential Shapes
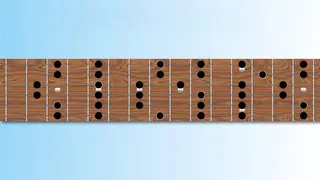
Each of the five shapes represents a different way to play the same chord across the fretboard. Let's use G major as our example:
The C-shape for G major appears around the 7th fret. Your fingers form the same pattern as an open C chord, but you're barring across the 7th fret to create G major. This shape gives you a bright, ringing tone that's perfect for rhythm work.
The A-shape for G major sits around the 10th fret. This is probably the most familiar to intermediate players because it's essentially a barre chord. Your index finger acts as the capo, and your other fingers form the A chord shape behind it.
The G-shape for G major happens in the open position. This is just your regular open G chord, but understanding it as part of the system changes everything. It's the foundation that connects to all the other shapes.
The E-shape for G major lives around the 3rd fret. This creates that chunky, powerful sound you hear in rock music. It's the same finger pattern as an open E chord, just moved up the neck.
The D-shape for G major appears around the 12th fret. This shape is trickier to fret cleanly, but it gives you access to those sweet high notes that make solos sing.
Moving to Any Key
Here's where the system becomes truly powerful: these same five shapes work for every single chord in music. The pattern doesn't change, only the starting position does. If you want to play A major instead of G major, you simply move each shape up two frets. For F major, you move everything down two frets from the G major positions.
This means once you learn the five shapes in one key, you've actually learned them in all twelve keys simultaneously. The C-shape that gave you G major at the 7th fret becomes A major at the 9th fret and F major at the 5th fret. The finger patterns remain identical, but the musical results are completely different chords.
The beauty of this system is its mathematical precision. Each fret represents a half-step in music, so moving any CAGED shape up one fret raises the chord by a half-step. Want to play B major? Take your G major shapes and move them up four frets. The relationships between the shapes stay exactly the same, but now you're playing in an entirely different key.
Why These Shapes Matter
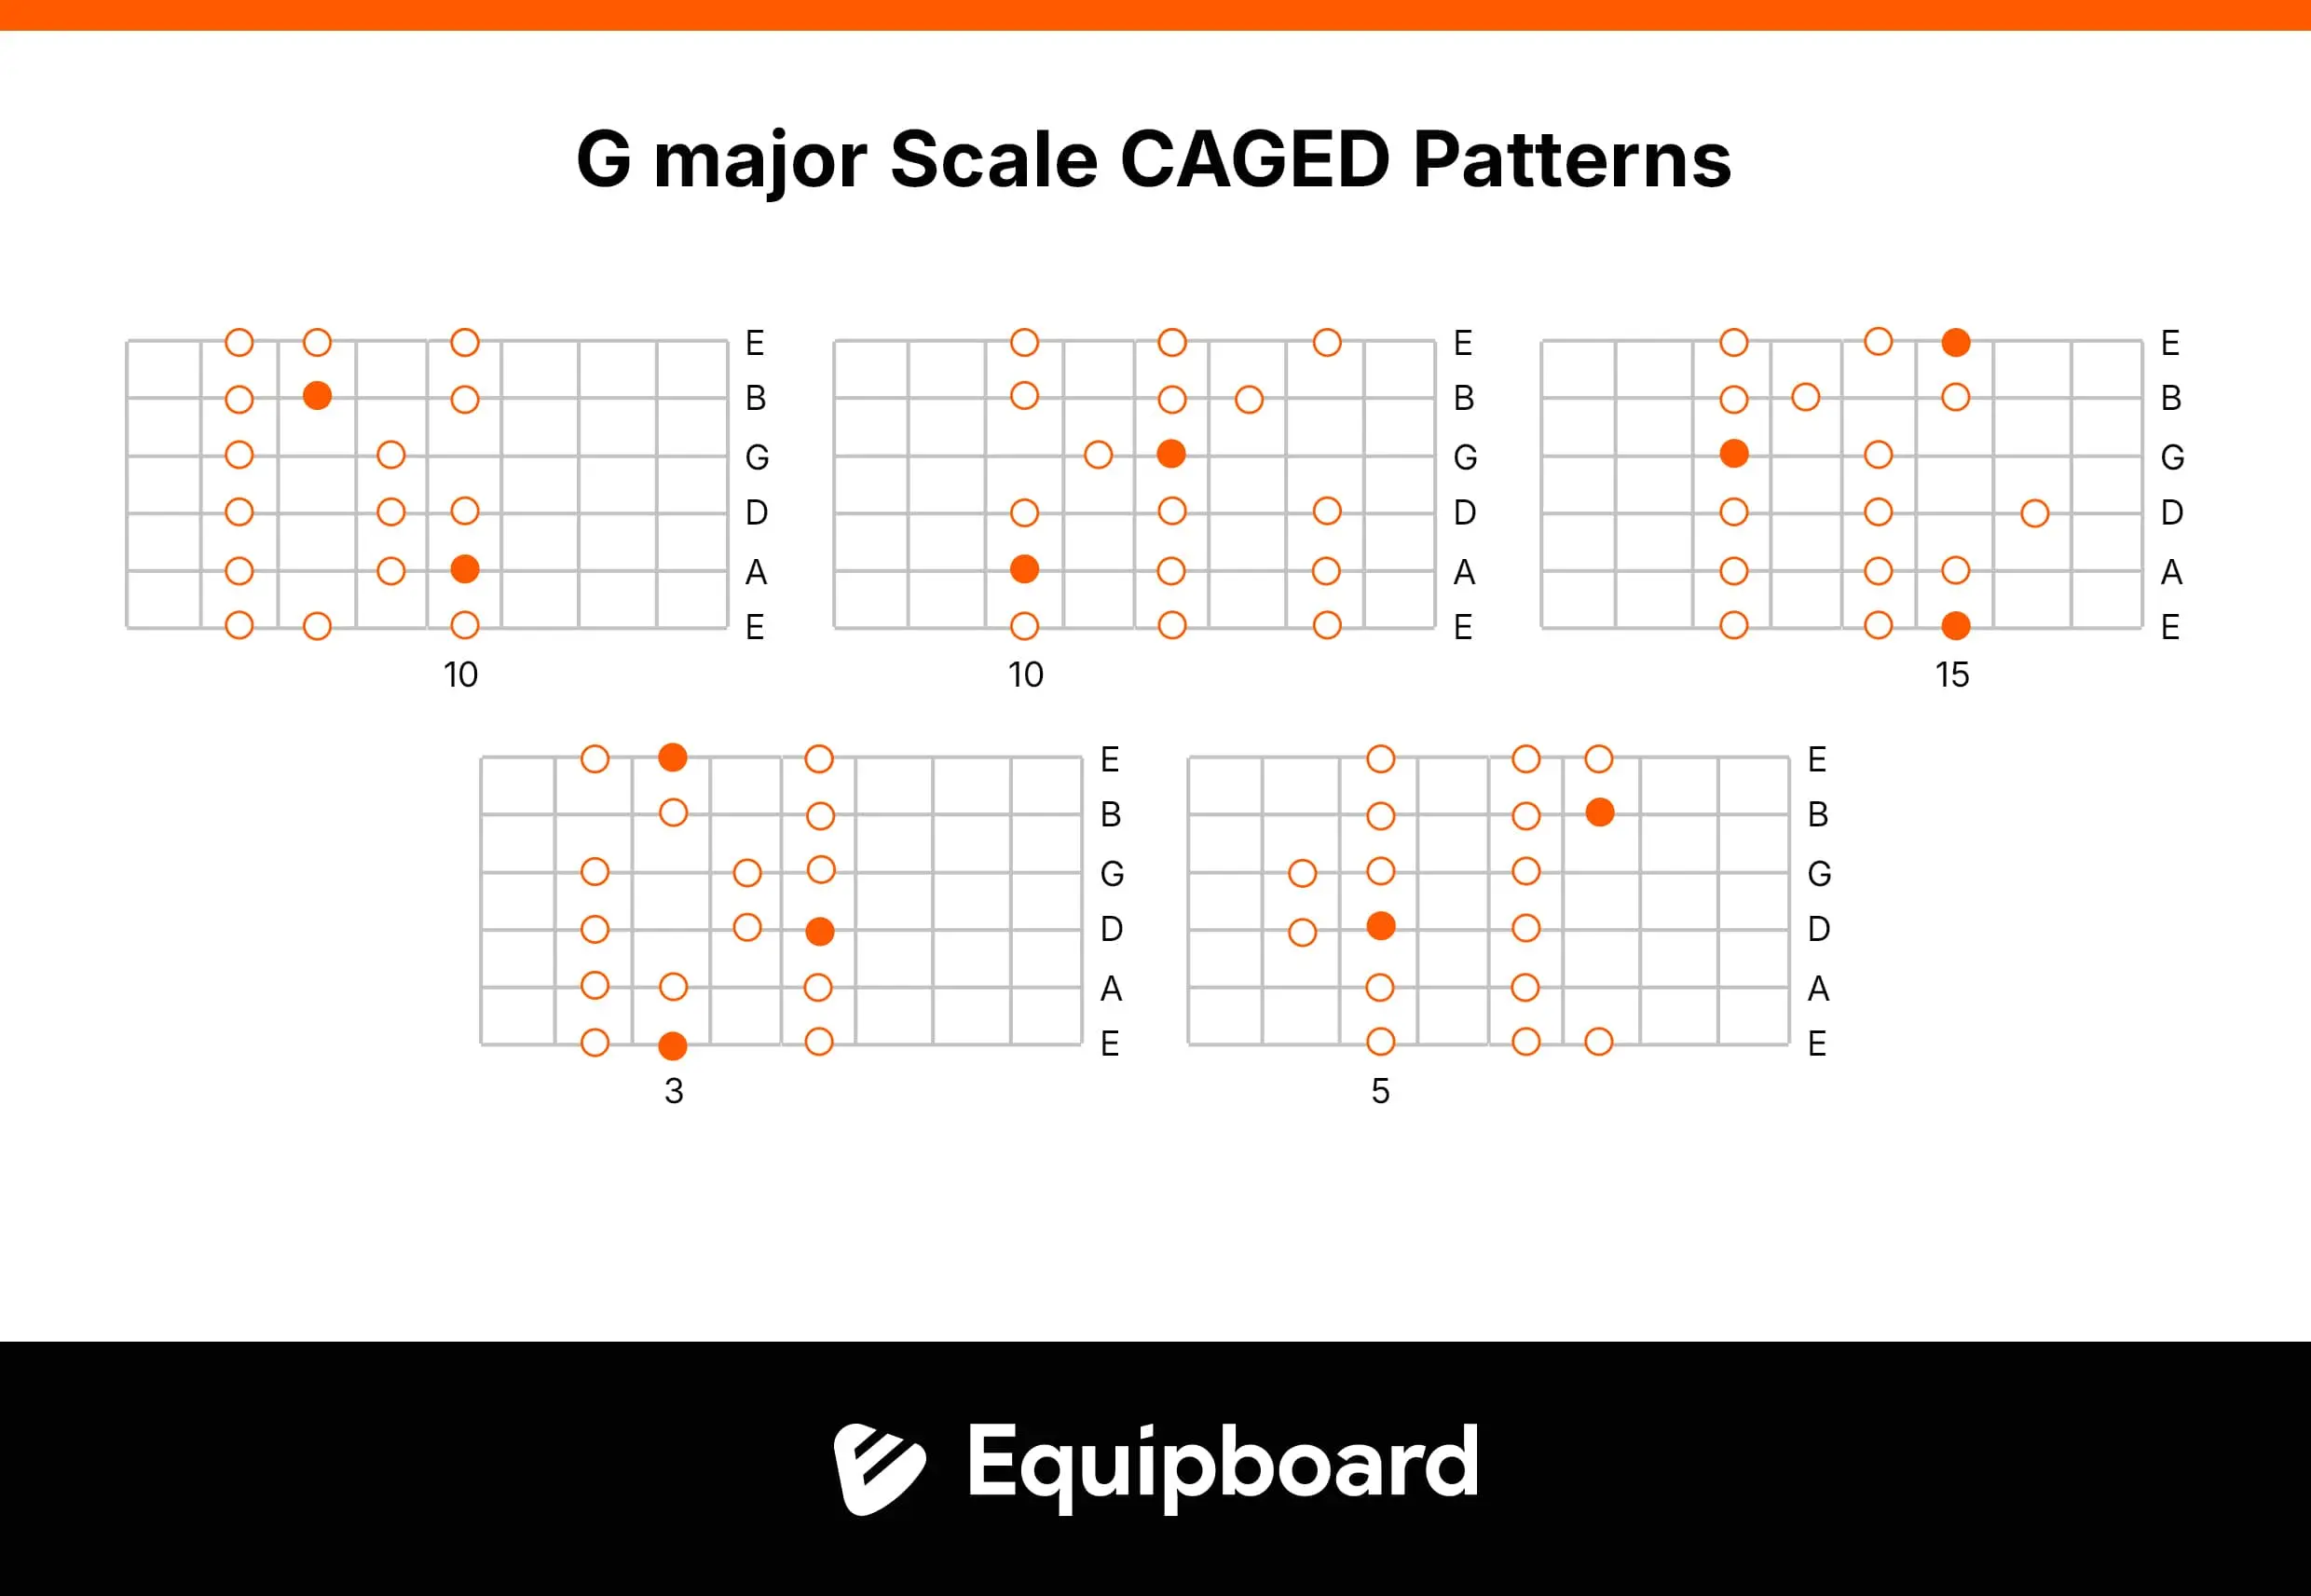
Here's the breakthrough moment: these aren't just chord shapes. They're actually maps that show you where every note of the scale lives within each position. Every major scale, every pentatonic scale, every arpeggio can be played within the boundaries of these five shapes.
When you understand this concept, the fretboard stops being a random collection of frets and starts being a logical, organized system. Each shape becomes a home base where you can play melodies, solos, and rhythm parts with confidence.
Connecting the Dots: How the Shapes Overlap
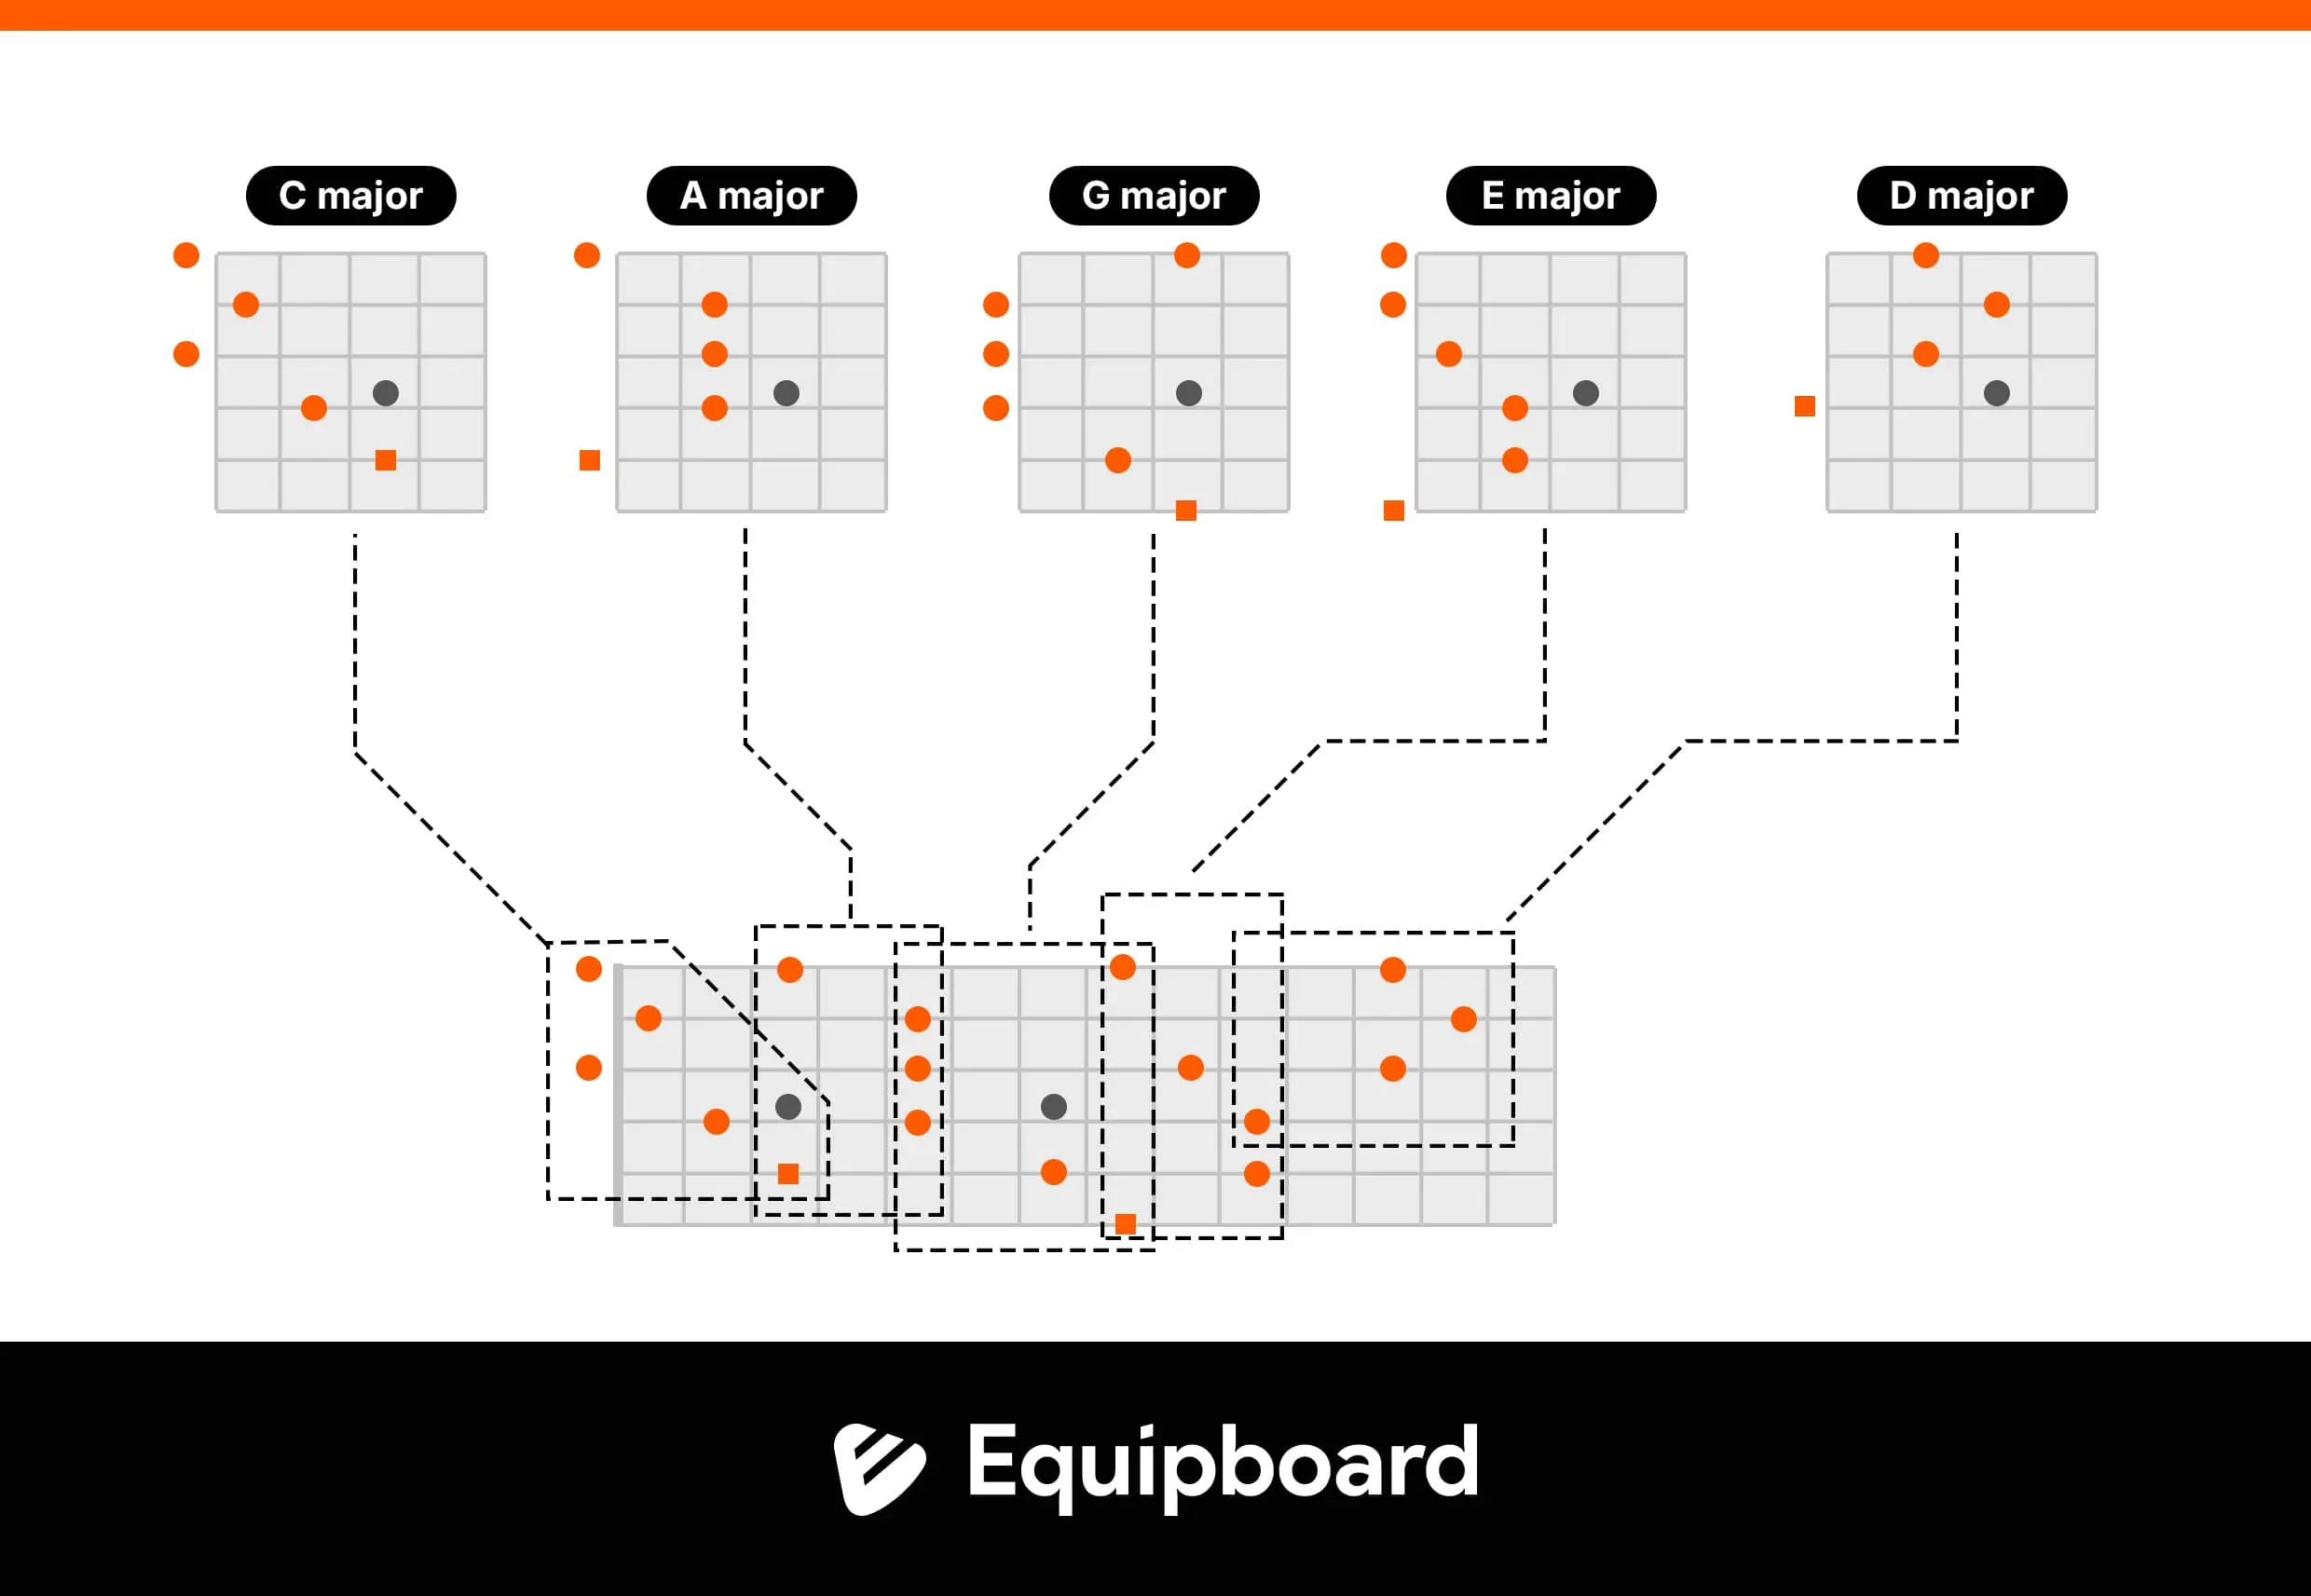
Now comes the real magic. The CAGED shapes aren't isolated islands scattered across the neck. They're more like puzzle pieces that fit together perfectly, creating one continuous map of the entire fretboard.
The Chain Reaction
Start with your open G chord (the G-shape). Now look just above it on the neck. The very next shape is the E-shape for G major around the 3rd fret. Move up again, and you'll find the D-shape around the 5th fret. Keep climbing, and you'll discover the C-shape around the 7th fret, followed by the A-shape around the 10th fret.
But here's where it gets interesting: after the A-shape, the pattern repeats. The next shape up is another G-shape, just an octave higher around the 12th fret. The system creates an endless chain that covers the entire length of your guitar neck.
The Overlap Zones
The real breakthrough happens when you notice the overlap zones. Each CAGED shape doesn't just end where the next one begins. They actually share common notes and fingering patterns. These overlaps are your highways between positions.
For example, the highest notes in the E-shape around the 3rd fret are the same as the lowest notes in the D-shape around the 5th fret. When you're soloing and you reach the top of one shape, you can seamlessly transition into the next shape without missing a beat.
Visualizing the Complete Picture
Imagine looking down at your guitar neck from above. Instead of seeing six separate strings with random fret markers, you now see five interconnected zones, each containing the same scale pattern but in different positions. It's like having five different camera angles of the same musical landscape.
This is why the CAGED system is so powerful for improvisation. You're not just learning five separate scale patterns. You're learning one complete system that covers every possible note on the fretboard. Once you see these connections, you'll never feel trapped in one position again.
Your New Practice Partner: Why the Looper is Key
Here's where most CAGED tutorials fall short. They show you the shapes, maybe even explain how they connect, but then leave you to figure out how to actually practice them. That's like giving someone a map to a large beautiful island but no car to explore it properly.
Beyond the Metronome
Most guitarists practice scales with a metronome, and while timing is important, it's not the whole picture. A metronome only tells you when to play notes. A looper tells you which notes to play and why they work.
When you record a chord progression and play it back, you're creating harmonic context. Suddenly, you're not just running through scale patterns mechanically. You're making musical choices. Some notes sound strong and confident over the chords, while others create tension that needs to resolve. This is how you develop your musical ear while building technical skills.
The Harmonic Learning Experience
Let's get specific about what this means in practice. When you play a G major pentatonic scale over a metronome, every note feels equally valid. You might play the sequence G-A-B-D-E-G without any real understanding of how these notes function musically. The metronome doesn't care which notes you choose, so you develop technical facility without musical awareness.
Now imagine playing that same scale over a looped progression of G major to C major. Suddenly, the B note takes on different meanings. Over the G major chord, B is the major third, creating a bright, happy sound that feels resolved and stable. But when that same B note plays over the C major chord, it becomes the major seventh, creating a jazzy tension that wants to resolve down to the C note.
This isn't theoretical knowledge anymore. You're hearing these relationships in real time. Your ear learns to distinguish between stable chord tones and active tension notes, which is the foundation of melodic playing.
Real-World Musical Scenarios
Consider how this applies to different musical situations. If you loop a simple Em to Am progression (two minor chords a fourth apart), you'll discover that certain notes in the E minor pentatonic scale work beautifully over both chords, while others create interesting tensions that need careful handling.
The E note serves as the root over Em and the fifth over Am, making it a safe landing spot throughout the progression. The G note acts as the minor third over Em and the minor seventh over Am, giving it a bluesy quality that works well for both chords. But the B note tells a different story. Over Em, it's the fifth, solid and stable. Over Am, it's the second, creating a suspension that adds sophistication to your melodic lines.
Did all of that just fly right over your head? Do not worry. That is the whole point of the CAGED system. You don’t need to memorize all of this. Just record any chord progression with your looper. Play it back and try playing different notes in the CAGED patterns. Initially, it will feel vague but as you put in more time, you will develop an instinct that will give you a sixth sense for which notes will work and which won’t work for the musical context you are aiming for.
Dynamic Chord Progressions
The learning becomes even more powerful when you work with progressions that have more harmonic movement. Try looping a progression like G - Em - C - D, the classic vi-IV-I-V in the key of G major. Now your pentatonic scale notes take on completely different roles as the harmony shifts.
Over the G major chord, you're playing in the home key, so everything feels stable and resolved. Move to Em, and suddenly you're outlining the relative minor, giving the same notes a darker, more introspective quality. The C major chord shifts the tonal center, making some notes feel more tense while others become new resolution points. Finally, the D major chord creates dominant tension that makes certain notes want to pull back toward the G major chord.
Building Rhythmic Sophistication
The looper also teaches rhythmic sophistication in ways a metronome cannot. When you practice scales with a metronome, you typically play in steady eighth notes or sixteenth notes, focusing on mechanical precision. But real music has rhythmic variety, syncopation, and phrasing that breathes with the harmonic rhythm.
With a looped chord progression, you naturally start to phrase your scale passages musically. You might hold certain notes longer over stable chords, allowing them to ring and create harmonic resonance. Over changing chords, you might play faster passages that outline the harmonic movement, creating melodic lines that follow the chord changes rather than fighting against them.
The chord progression becomes your rhythmic guide in a much more musical way than a metronome's mechanical click.
Developing Musical Instincts
Perhaps most importantly, the looper develops your musical instincts rather than just your technical skills. When you practice with a metronome, you're training your fingers to move in predetermined patterns at specific speeds. When you practice with a looper, you're training your ear to guide your fingers toward musically satisfying choices.
This creates a completely different relationship with your instrument. Instead of executing memorized patterns, you start making real-time musical decisions. Should I bend this note or play it straight? Should I hold this note longer to emphasize the chord change? Should I play higher or lower in this section to create a better melodic contour?
These decisions happen naturally when you're playing over harmonic content. The chord progression provides the musical context that makes some choices obviously better than others. Your ear becomes your guide, leading you toward more musical and satisfying playing. A few minutes of playing like this is many times more fulfilling than endless scale runs over the clicks of a metronome.
What You Need
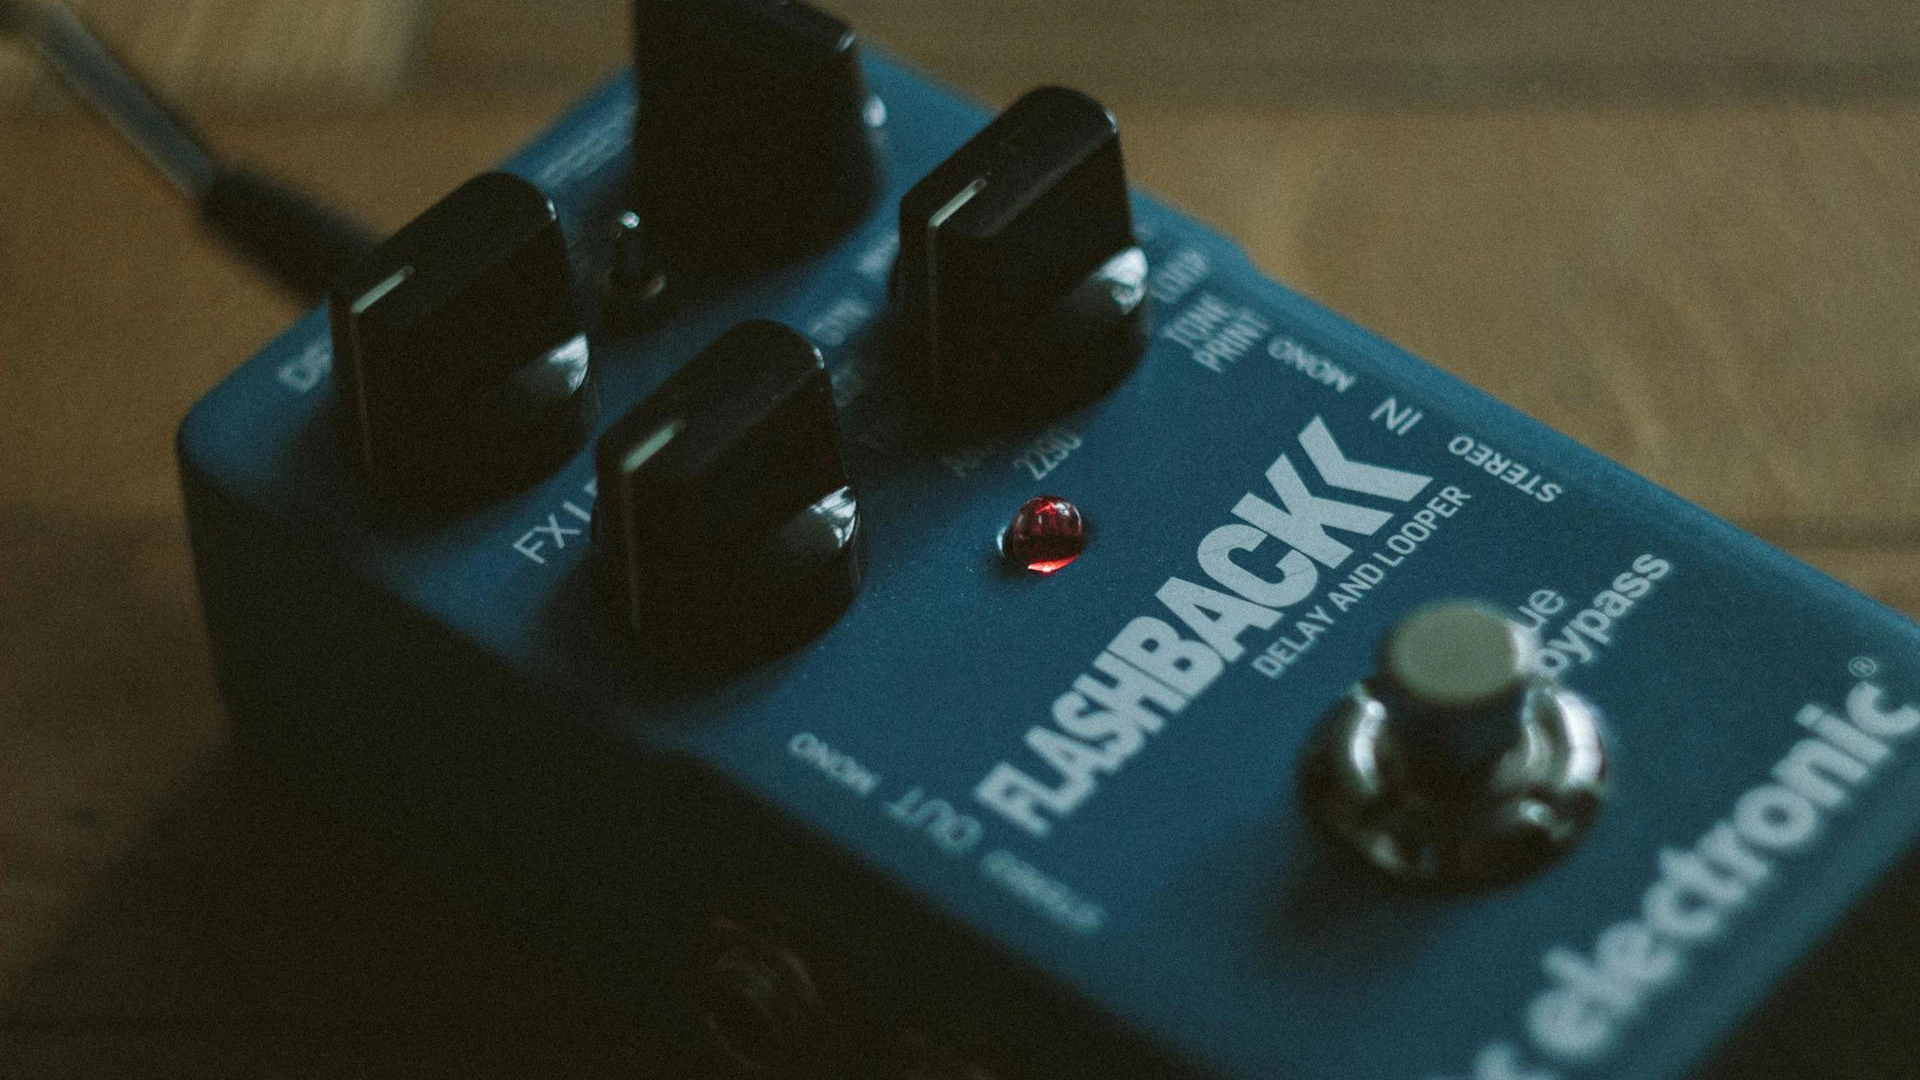
You don't need an expensive, feature-packed looper for this practice method. Any basic model will work perfectly. The TC Electronic Ditto, Boss RC-1, or similar single-footswitch loopers are ideal. You just need the ability to record a short phrase and play it back continuously.
The key is simplicity. Complex loopers with multiple tracks and effects can actually distract from the focused practice we're doing here.
The Exercises (The "How-To" Core)
Now we get to the practical application. These three exercises will take you from understanding the CAGED system conceptually to actually using it fluently in your playing. Each exercise builds on the previous one, so don't skip ahead.
Exercise 1: Laying the Foundation
Setting Up Your Loop
Start by recording a simple two-chord progression. G major to C major works perfectly for this exercise. Play each chord for four beats, keeping the rhythm steady and simple. Don't worry about fancy strumming patterns. Just play clean, clear chord changes that give you a solid harmonic foundation. Once your loop is recorded and playing back, you have created your practice track.
The Shape-by-Shape Exploration
Now comes the systematic exploration. Your job is to play the G major pentatonic scale over your loop, but with one crucial restriction: stay within the boundaries of one CAGED shape at a time.
Start with the G-shape around the open position. Play the pentatonic scale slowly, listening to how each note interacts with the G and C chords in your loop. Notice which notes sound stable and which create tension. This is your ear training happening in real-time.
Move to the E-shape around the 3rd fret. Play the same pentatonic scale, but now using only the notes available in this position. The scale pattern will look different under your fingers, but your ears will recognize it as the same musical content.
Continue this process through all five shapes: G-shape, E-shape, D-shape, C-shape, and A-shape. Take your time with each position. The goal isn't speed. The goal is familiarity with how the same scale feels and sounds in different areas of the neck.
Exercise 2: Climbing the Fretboard Ladder
The Transition Challenge
This exercise teaches you to move fluidly between CAGED positions. Using the same G-to-C loop, your task is to play the pentatonic scale up in one shape, then immediately continue down in the next adjacent shape without stopping.
Start in the G-shape and play the scale ascending. When you reach the highest comfortable note in that position, immediately transition to the lowest note of the E-shape and play the scale descending. The key word here is immediately. No pauses, no hesitation, no stopping to think about where your fingers go next.
This creates a seamless melodic line that flows from one position to the next. It sounds like one continuous musical phrase, even though you're using two different fingering patterns.
Building the Chain
Once you can smoothly connect G-shape to E-shape, expand the chain. Go G-shape ascending, E-shape descending, then D-shape ascending, C-shape descending, and finally A-shape ascending. Now you've traveled the entire length of the neck in one continuous musical journey.
The beauty of this exercise is that it trains your fingers and your brain simultaneously. Your fingers learn the physical transitions between shapes, while your brain learns to hear these positions as one connected system rather than separate scale patterns.
Reverse Direction
Don't forget to practice the reverse direction. Start with the A-shape at the top of the neck and work your way down. This challenges your muscle memory in a different way and ensures you can navigate the fretboard in both directions with equal confidence.
Exercise 3: Thinking in Chords (Arpeggios)
From Scales to Arpeggios
This final exercise shifts your focus from playing every note in the scale to targeting specific chord tones. Instead of running through the complete pentatonic scale, you'll play only the notes that make up the G major and C major chords as they appear in your loop.
This is where the musical magic happens. Targeting chord tones is the secret to melodic soloing. It's the difference between playing scales over chords and actually playing music that connects with the harmony.
The Arpeggio Hunt
Within each CAGED shape, identify where the chord tones live. For G major, you're looking for the notes G, B, and D. For C major, you want C, E, and G. These are your target notes, the ones that will sound most stable and satisfying over each chord.
Start with the G-shape position. When the G chord is playing in your loop, play only the G, B, and D notes within that shape. When the C chord comes around, switch to playing only the C, E, and G notes. This trains your ear to hear chord changes and your fingers to respond appropriately.
Cross-Position Arpeggio Playing
Once you're comfortable finding chord tones within individual shapes, combine this with the position-shifting from Exercise 2. Play G major arpeggios ascending through the G-shape, then continue with the same arpeggio descending through the E-shape. When the C chord comes around, switch to C major arpeggios using the same position-shifting approach.
This exercise is challenging because it requires you to think harmonically while moving physically across the fretboard. But it's also incredibly rewarding because it teaches you to play melodically rather than just running through scale patterns.
The Neck Is Smaller Than You Think

After working through these exercises consistently, something remarkable happens. That intimidating, mysterious guitar neck starts to feel manageable. What once seemed like an endless maze of random notes becomes a logical, organized system that makes perfect sense.
The Mental Shift
The biggest change isn't in your fingers. It's in your mental model of the guitar. Instead of seeing 22 frets scattered with random notes, you see five comfortable zones where you can play melodies, solos, and rhythm parts with confidence. The fretboard becomes smaller, more intimate, more friendly.
This mental shift affects everything about your playing. When you're improvising, you're not desperately searching for the "right" notes. You're choosing from a palette of musical colors, knowing exactly where each color lives on the neck. Your playing becomes more intentional and less accidental.
The Looper Connection
The looper pedal transforms this theoretical knowledge into practical skill. Instead of memorizing abstract patterns, you've built muscle memory through musical context. Every scale run, every position shift, every arpeggio has been practiced over real chord progressions with immediate harmonic feedback.
This is why the looper method works so well. It engages your musical ear while training your technical skills.
Beyond the Exercises
These three exercises are just the beginning. Once you've mastered the basic CAGED shapes and their connections, you can apply this system to any scale, any chord progression, any key. The pentatonic scale was just your training ground. The real playground is everything else: major scales, minor scales, modes, jazz chords, and beyond.
The looper remains your constant practice partner. Want to work on blues progressions? Record a 12-bar blues and apply the CAGED system. Interested in jazz standards? Loop a ii-V-I progression and explore how the shapes work over more complex harmony. The possibilities are endless.
Your guitar neck is no longer a mystery. It's a playground where every area is familiar, every transition is smooth, and every musical idea has a home. The fretboard prison has become a creative playground, and you hold all the keys.
About the authors
S. Jino is an accomplished multi-instrumentalist and music producer based in Kolkata, India, distinguished by his self-taught mastery and unique blend of technical acumen and musical performance. His extensive experience was forged through hands-on dedication, starting with the full restoration of a broken guitar. Jino's capabilities span keyboards, pedals, and advanced digital production, reflecting a comprehensive skill set developed independently. As a significant contributor to the music scene, Jino regularly performs with worship bands and college ensembles. He has also established himself as a reliable and authoritative professional in freelance mixing, mastering, and original music creation. Inspired by the innovative sounds of Brian May and David Gilmour, and influenced by Kolkata's vibrant metal community, Jino is committed to the intricate art of vintage gear restoration and the continuous exploration of music and technology fusion. His current professional setup, featuring a meticulously restored nameless guitar, a Fender Player Strat, and a Boss Katana 50. Read more