Table of Contents
Equipboard
Equipboard is the world's largest community of artists and their gear. Read our review process.
We are reader-supported. When you buy through links on our site, we may earn an affiliate commission. Learn more.
If you've ever tried recording drums, you know it can feel like wrestling with a musical octopus. There's a reason why so many home recordings fall short - drums are complex, loud, and have a nasty habit of exposing every flaw in your room acoustics.
Yet nailing a great drum sound is absolutely worth the effort. A solid drum recording anchors your entire mix and can be the difference between a track that sounds professional and one that screams "bedroom demo." The good news? You don't need a million-dollar studio to get there.
The real secret isn't about having the most expensive mics or the fanciest preamps. Sure, those help, but the foundation of great drum recordings starts with basics many people rush past - a well-tuned kit that sounds good in the room. Sometimes that means spending an hour adjusting drum heads instead of obsessing over mic placement. Trust me - your recordings will thank you for it.
These days, you've got options. Maybe you want to keep it simple with just a few well-placed mics, capturing the natural sound of your kit. Or perhaps you're ready to dive into a full multi-mic setup for maximum control. Both approaches can work brilliantly - it's all about understanding the core principles and choosing the right approach for your music.
Pre-Recording Preparation
Before diving into microphones and recording techniques, let's focus on the fundamentals that will make or break your drum recordings. Think of this as building a solid foundation - skip these steps, and you'll be fighting an uphill battle later.
Drum Tuning and Treatment
Start by inspecting each drum head. Look for dents, wear spots, or any deformation around the bearing edge. New heads aren't just about avoiding breaks - they give you the best possible tone to work with. For the kick drum, focus on getting a balanced tone between 'point' and boom. Tune both heads to complementary pitches - try starting with the resonant head slightly lower than the batter head for a full, natural sound.
The snare deserves special attention. Tune the top head first, aiming for a tone that rings true without choking. The bottom head and snare wires dramatically affect articulation - try tuning the bottom head about a third higher than the top for that classic crack. Fine-tune the snare wire tension carefully - too loose sounds sloppy, too tight kills the natural buzz.
For toms, tune them in relation to each other. Many drummers prefer intervals of thirds or fourths between each tom. Remove the resonant heads and listen to each drum shell's natural pitch - this can guide your tuning decisions. A drum dial can help achieve even tension, but trust your ears above all.
Check out our detailed guide on tuning drums here.
Room Selection and Treatment
Your recording space significantly impacts the final sound. Square rooms create strong standing waves at predictable frequencies, making certain notes jump out unnaturally. If possible, position the kit in a space with at least one irregular wall angle.
Start by identifying the room's acoustic problems. Clap your hands and listen - any flutter echo or long decay times need addressing. Focus your acoustic treatment on three key areas: behind the drummer (early reflections), the side walls (flutter echo), and overhead (ceiling reflections). Rigid fiberglass panels work best, but thick moving blankets can help in a pinch.
Consider the floor too - a thick carpet or rug under the kit can prevent harsh reflections from a hard floor. Leave some space in front of the kick drum uncovered for maintaining attack and definition.
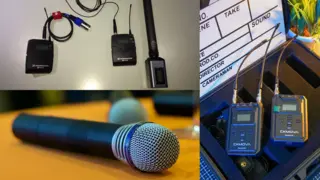
Essential Recording Gear
Your interface needs enough preamps for your planned microphone configuration. Look for units with at least 8 inputs for a basic full-kit recording setup. Preamp quality matters too. You need clean gain without adding noise, especially for quieter sources like room mics.
Invest in quality XLR cables and plenty of them. Pro tip: label both ends of each cable and test them all before the session. Keep spare cables handy - they have a habit of failing at the worst moments.
Microphone stands are more important than most realize. Cheap boom stands often slip under the weight of heavy mics, potentially ruining takes. Get stands with solid clutches and stable bases. Consider low-profile stands for toms and short stands for kick drums to minimize setup headaches.
For monitoring, closed-back headphones are essential. They help prevent bleed into the microphones and let you hear the kit clearly while recording. The drummer needs a reliable headphone mix - consider a small headphone amp for independent volume control.
Types of Microphones for Drum Recording

Understanding different microphone types and their characteristics helps you make informed choices for each part of the drum kit. Each type excels in specific applications, and knowing these strengths guides both microphone selection and placement.
Dynamic Microphones
Dynamic microphones are the workhorses of drum recording. Their robust construction and ability to handle high sound pressure levels (SPL) make them ideal for close-miking drums. They excel at capturing the attack and body of drums without overloading.
The relatively slow transient response of dynamic mics can actually benefit drum recording, naturally smoothing out harsh frequencies. Their proximity effect - an increase in bass response when placed close to the source - often adds desirable weight to toms and snare drums.
Condenser Microphones
Condenser microphones offer superior detail and transient response compared to dynamics. Their increased sensitivity and extended frequency response make them particularly suitable for overhead and room microphone applications. Small-diaphragm condensers provide excellent clarity and accuracy, ideal for capturing cymbal detail and the overall picture of the kit.
Some engineers also favor them for kick drum outside mics, where they can capture the full low-end development of the drum.
Ribbon Microphones
Ribbon microphones offer a smooth, natural response that can help tame harsh frequencies in cymbals and add warmth to the overall drum sound. Their figure-8 polar pattern makes them particularly useful for mid-side recording techniques and room miking.
Modern ribbon microphones have overcome the fragility issues of vintage designs, though they still require careful handling. Their natural roll-off of higher frequencies can complement digital recording's sometimes clinical accuracy.
Specialty Microphones
Subkick or low-frequency capture devices, while technically speakers used as microphones, have become standard tools for capturing sub-bass frequencies from kick drums. Boundary or PZM (Pressure Zone Microphone) designs can be effective for capturing room sound when placed on walls or floors.
Number Of Microphones & Placement
Every drum recording starts with a fundamental choice: how many microphones do you need? Let's break down the most effective approaches
Fewer Microphones
We’ll start with simpler setups that can achieve amazing results. These might require fewer microphones but the placement of each mic becomes very crucial. There are a few tried and tested techniques that will help you get your setup just right.
The Glyn Johns Method
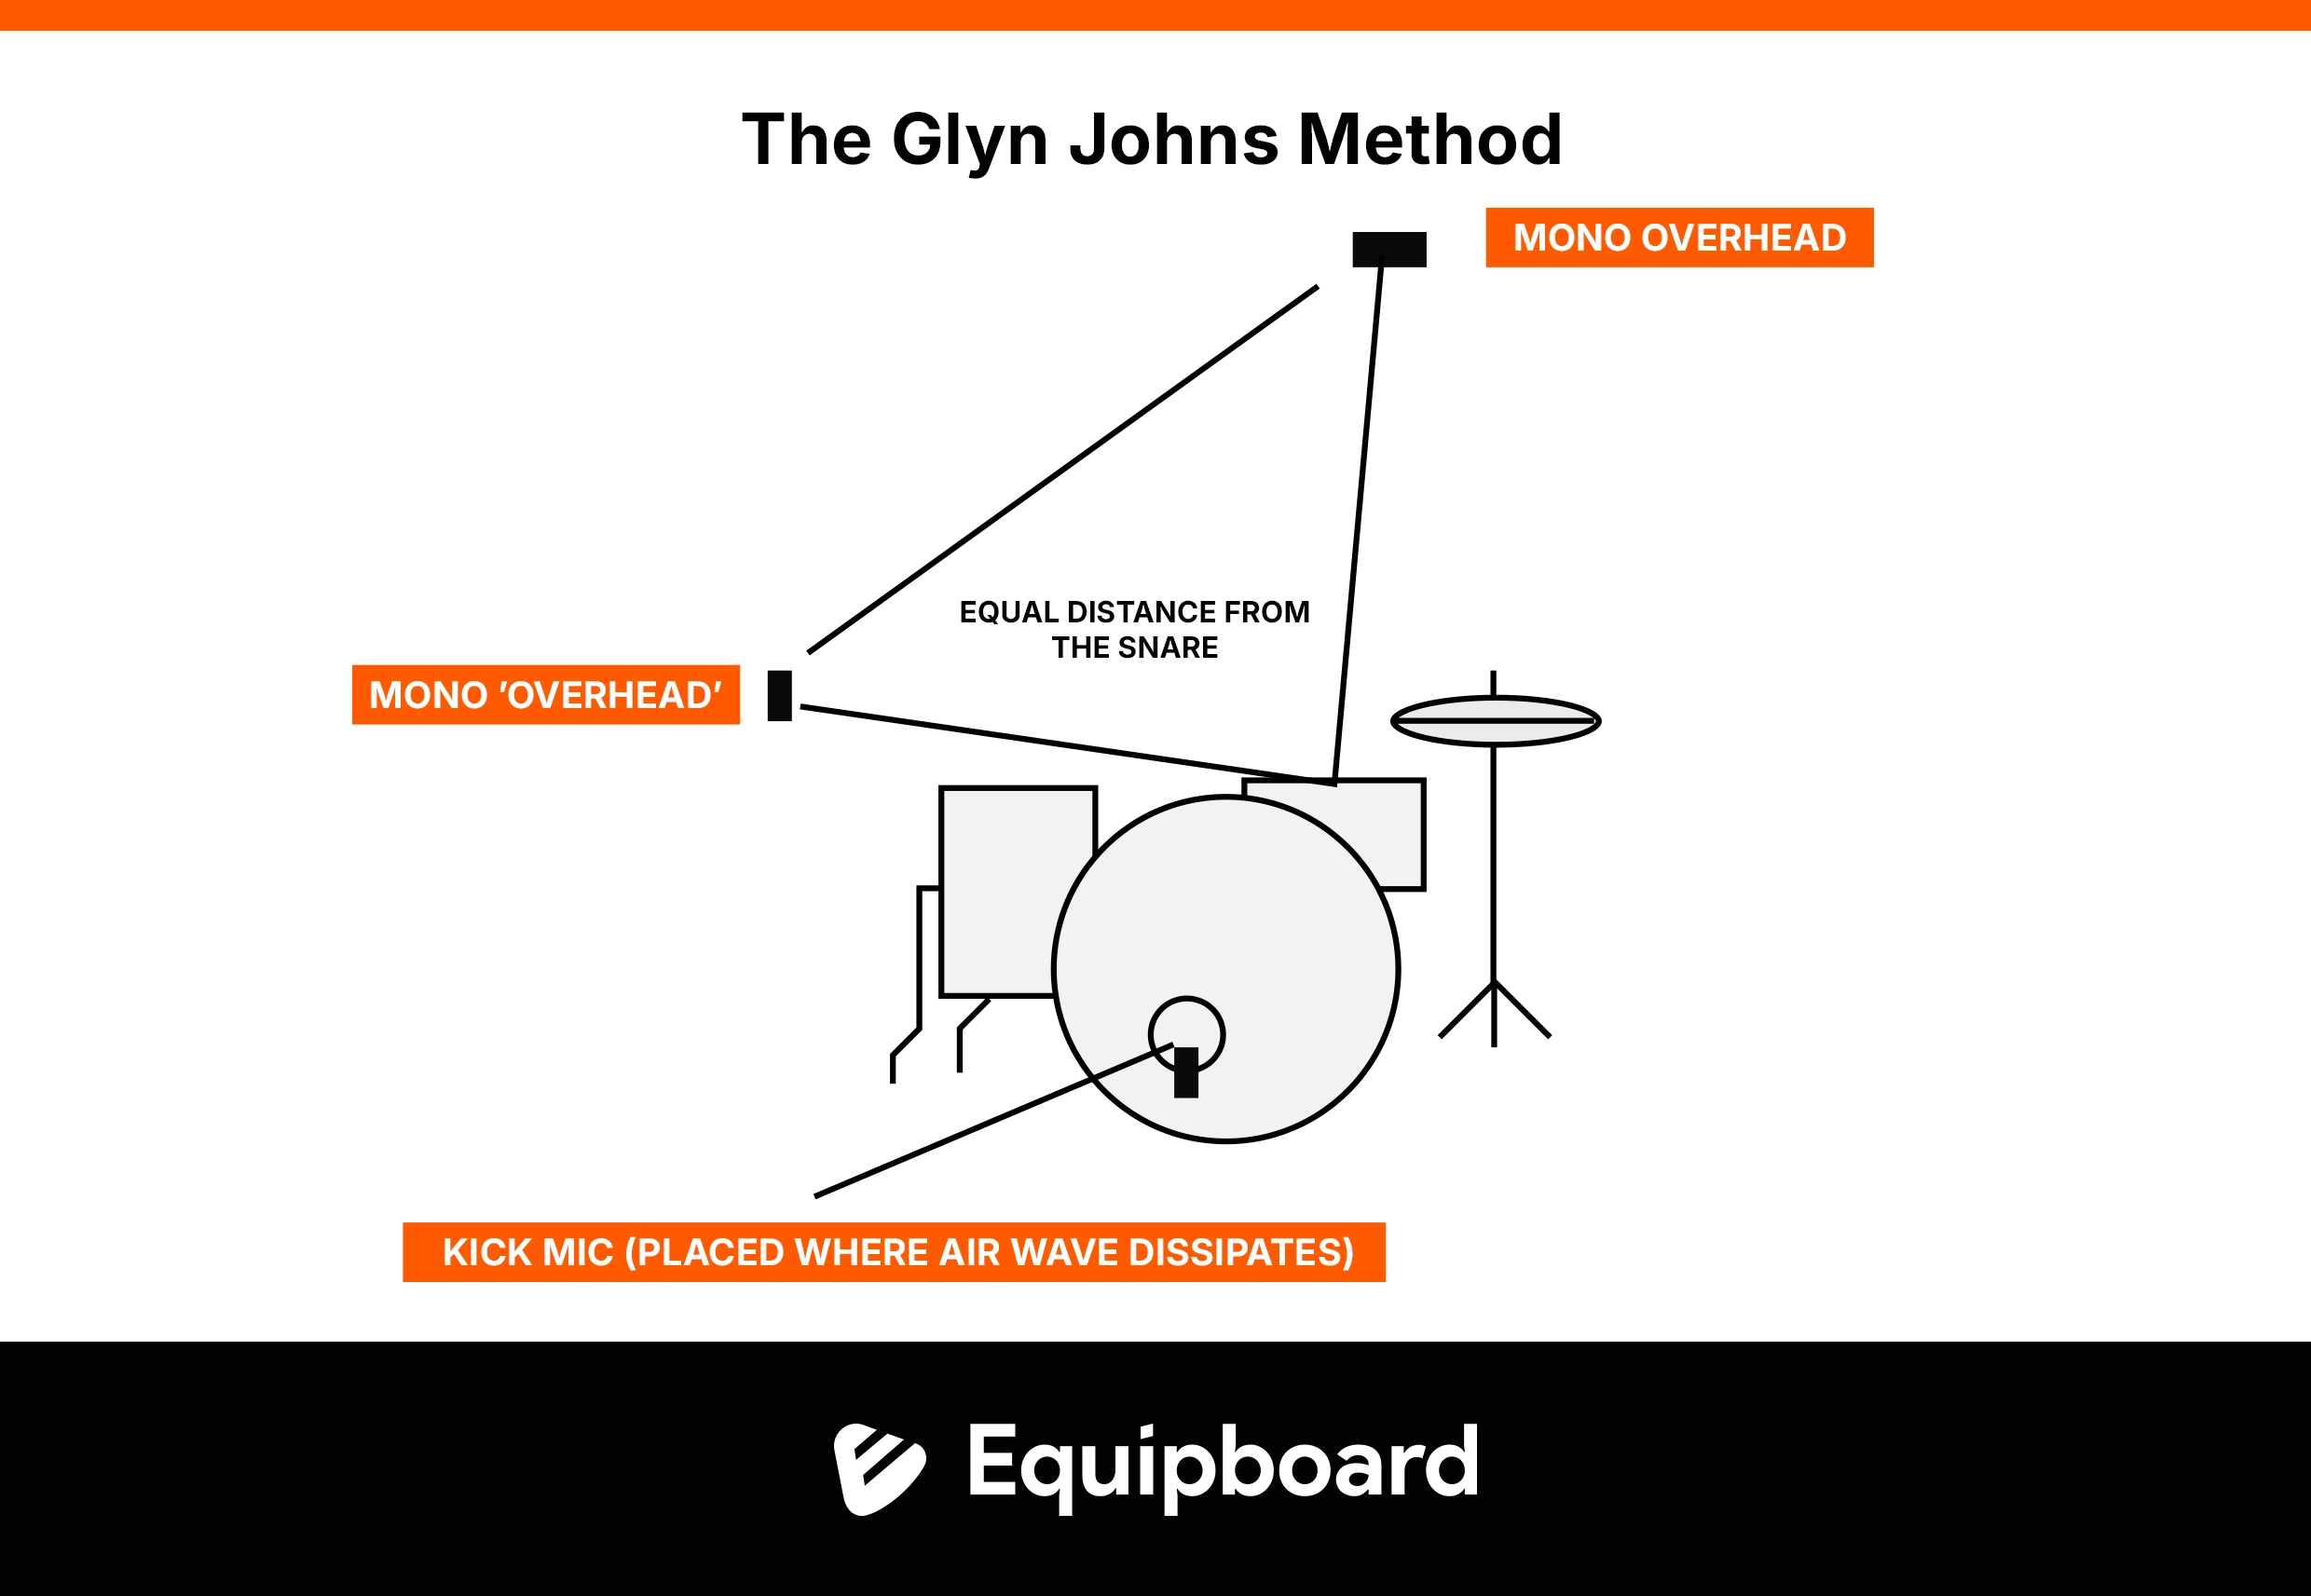
This famous technique uses just three or four microphones to capture a complete drum sound. Don't let its simplicity fool you – countless hit records have been made this way.
Start by placing your first microphone directly above the snare drum, about 40 inches high. Think of this as capturing what you'd hear if you were standing above the drummer. The second microphone goes to the right of the floor tom at the same height. Here's the crucial part: measure the distance from your snare drum to the first mic, then make sure the second mic is exactly the same distance from the snare. When these distances match, your drums will sound full and natural rather than hollow or distant.
Add a microphone inside your kick drum, pointing where the beater hits the head. If you want more control over your snare sound, place a fourth microphone near its rim, angled down toward the center.
The Recorderman Technique

While similar to Glyn Johns, this method often gives better results for modern music styles. Your first overhead microphone still goes above the snare, but the second one sits behind the drummer's right shoulder. The key is getting both microphones the same distance from both the snare and the kick drum. Think of it like making a triangle where both sides are exactly equal.
This positioning helps capture more of the kick drum's power while maintaining a balanced sound across the entire kit. Many engineers prefer this method because it gives you a more focused, punchy sound that works especially well for rock and heavier styles.
The Mid-Side (M/S) Technique
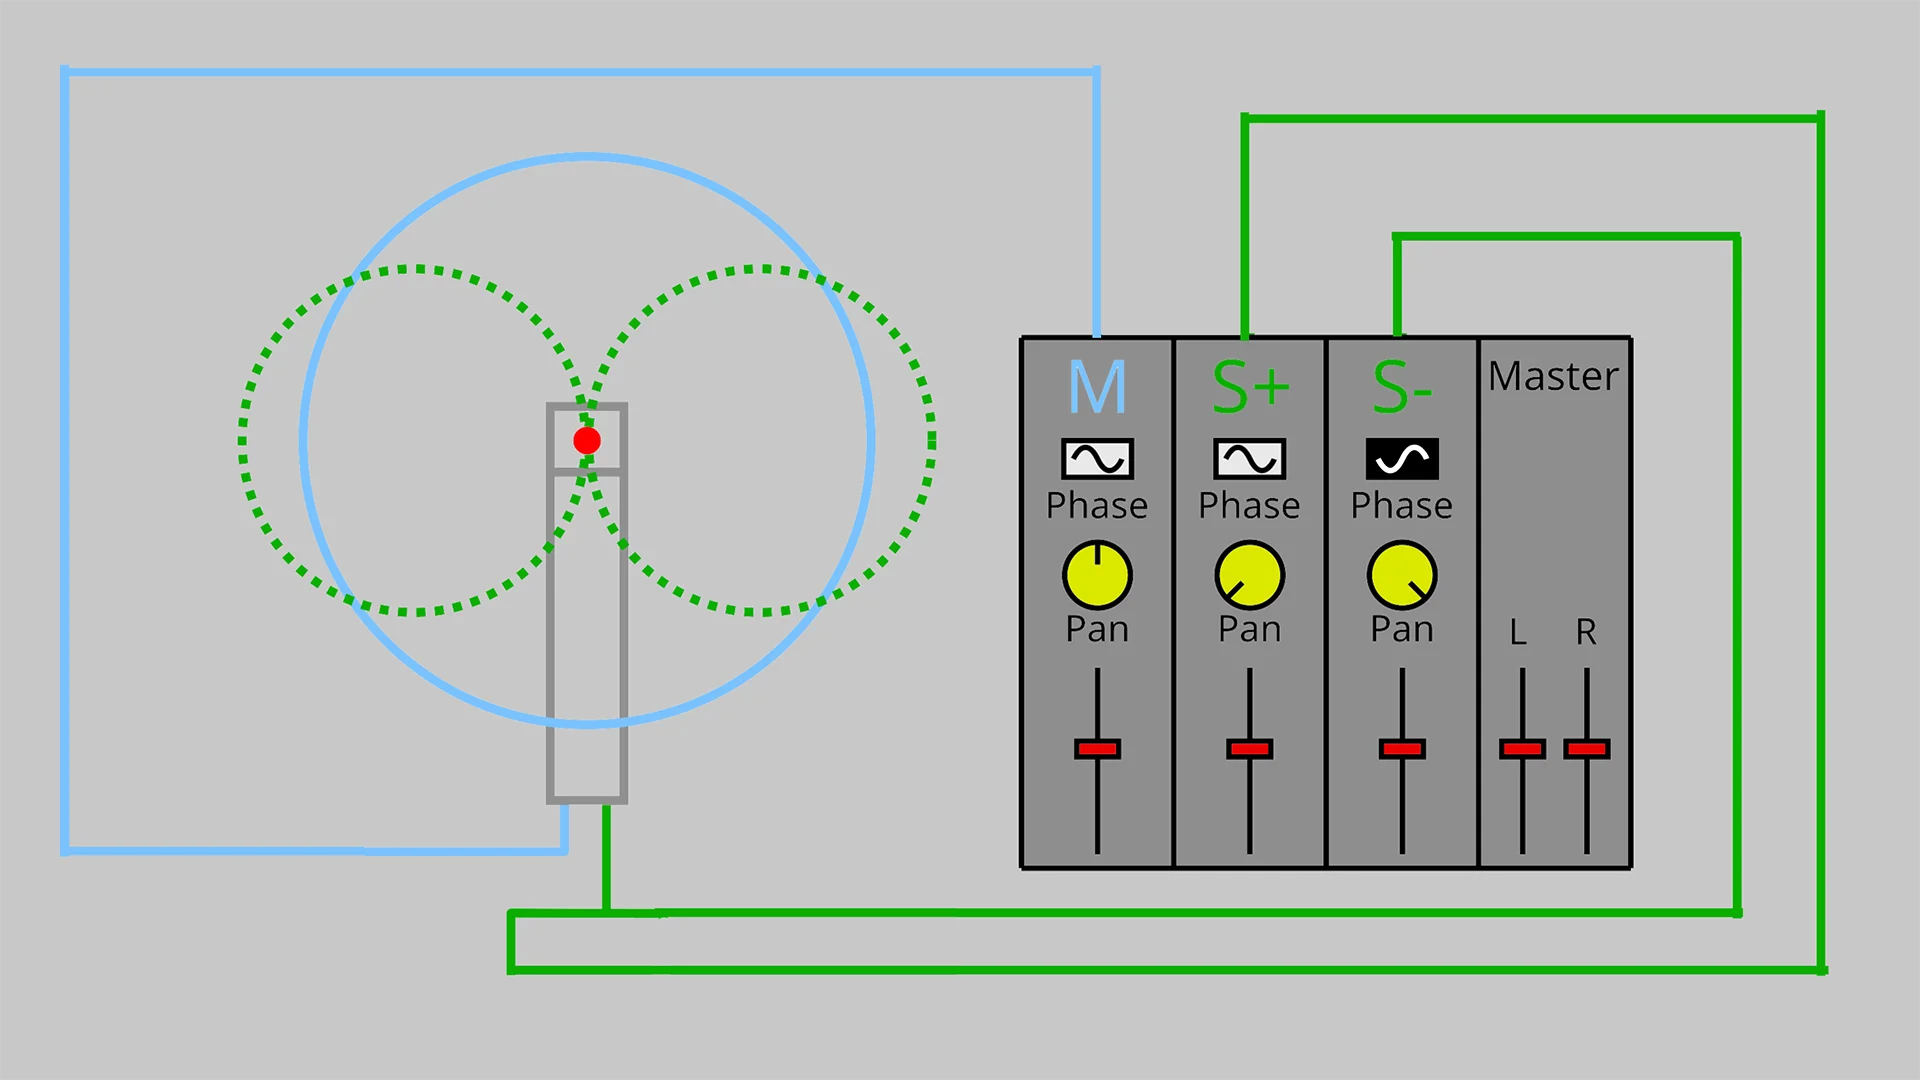
The Mid-Side technique offers precise control over stereo width while maintaining perfect mono compatibility, making it particularly valuable for broadcast and streaming applications where mono playback is common.
The setup requires a cardioid microphone for your mid channel and a bidirectional (figure-8) microphone for the side. Position the capsules as close to each other as possible, typically 6-7 feet above the kit. The mid microphone faces directly at the kit's center, capturing a solid mono foundation. The side microphone sits horizontally, with its null points facing the kit and the back wall.
The real power of M/S comes in the decoding process. The mid channel provides your center image, while the side channel creates the stereo information through a matrix process. In your DAW, split the side channel into two identical tracks, reverse the polarity of one side, and pan them hard left and right. The ratio between mid and side signals determines your stereo width – boost the side channels for a wider image, or reduce them for a more focused sound.
For drums specifically, this technique excels at capturing natural room ambience while maintaining a solid center image. Large-diaphragm condensers often work well for both mid and side channels, though some engineers prefer a ribbon microphone for the side channel due to its natural figure-8 pattern and smooth off-axis response.
Full Kit Miking Techniques
Moving beyond minimal miking setups, a full multi-microphone approach gives you granular control over each drum while introducing new challenges in phase relationships and overall cohesion.
Kick Drum Capture
The modern kick drum sound often combines two distinct microphones. Your beater mic, typically a large-diaphragm dynamic like an RE20 or D112, captures the critical attack. Position it 4-6 inches from the beater, just off-axis to avoid the direct blast of air. This positioning affects your attack-to-body ratio - closer placement emphasizes beater attack while moving back brings out more shell resonance.
The resonant head mic, often a subkick or large-diaphragm condenser, handles the low-end development. Position it 6-12 inches from the resonant head, experimenting with off-axis placement to find the sweet spot between depth and definition. The interaction between these two signals creates your final kick tone, with their relative balance shaping everything from vintage thump to modern click.
Comprehensive Snare Recording
Your primary snare mic needs to handle extreme SPLs while capturing the drum's full character. Position it 1-2 inches above the rim, angled 45 degrees toward the center. This classic placement works because it captures an ideal blend of attack, shell resonance, and stick articulation while staying clear of the drummer's path.
The bottom snare mic adds crack and detail. Position it a few inches from the bottom head, angled slightly away from the hi-hat. The phase relationship between top and bottom mics is critical - start by flipping polarity on the bottom mic, then fine-tune the position until the combination sounds punchy rather than hollow.
Tom Microphone Techniques
Recording toms requires careful consideration of both direct sound and bleed. Dynamic microphones offer excellent isolation and handle high SPLs effectively. For rack toms, position mics about an inch above each rim, angled 45 degrees toward the center of the head. This placement captures the fundamental tone while minimizing cymbal bleed. For floor toms, consider a slightly greater distance to capture their fuller low-end development.
Small-diaphragm condensers present an alternative approach, particularly useful on rack toms where space is tight. Their faster transient response captures more detail, though they require careful positioning to manage bleed. The trade-off between detail and isolation becomes a creative decision based on your musical context.
Advanced Overhead Techniques
Overhead microphones serve dual purposes in a multi-mic setup: capturing cymbals and providing a cohesive stereo picture of the entire kit. The ORTF technique (a stereo microphone technique developed by French) positions two cardioid microphones angled 110 degrees apart, with capsules separated by 17cm. This arrangement closely approximates human hearing, producing natural imaging and excellent mono compatibility.
Spaced pair configurations offer greater flexibility but demand precise measurement. For optimal phase coherence (multiple microphones capture the same sound and work together instead of fighting each other), maintain equal distances from each overhead to both the snare and kick. A useful technique involves measuring from the snare center to each overhead using a piece of string, then adjusting until these distances match exactly. The height of your overheads significantly impacts the kit's overall sound - lower positions emphasize shell sounds while higher positions create more room ambiance.
Room Microphone Strategies
Room microphones add crucial dimensionality to your drum sound. Near-field room mics, positioned 6-8 feet from the kit, capture early reflections and add energy. Far-field mics, placed 12-15 feet back, gather more room tone and ambiance. The character of these room mics varies dramatically with height - ear level captures a more direct sound, while higher positions emphasize ceiling reflections.
For more aggressive styles, the "crush mic" technique places a single microphone 4-6 feet in front of the kit, compressed heavily to add excitement. This signal often gets filtered to emphasize upper midrange frequencies, adding power without muddying the low end. Some engineers deliberately position room mics out of phase with the close mics to create specific tonal effects.
Combine different room mic techniques based on your musical needs. Parallel compression on room mics can add depth without losing impact, while subtle EQ can help them sit perfectly with your close-miked sounds. The key is treating room mics as an integral part of your drum sound rather than an afterthought.
The Actual Recording
Proper gain staging and signal flow form the foundation of professional drum recordings. Understanding how your microphones work together is just as important as knowing where to place them.
Gain Structure and Signal Flow
Setting proper input levels starts with understanding headroom. Digital recording differs fundamentally from analog - there's no "sweet spot" just below clipping where the signal sounds best. Instead, aim for peaks around -12 to -10 dBFS on your loudest hits. This preserves enough headroom for dynamic playing while maintaining a strong signal-to-noise ratio.
Pre-production level setting is crucial. Have your drummer play their loudest sections first, and set your preamp gains accordingly.
Managing Phase Relationships
Phase issues can rob your drums of power and clarity. Start by checking the relationship between your kick drum mics - when both are at equal volumes, you should hear maximum low-end impact. If the sound becomes thin or hollow, flip the polarity of one microphone.
Work your way through the kit systematically. Check snare top against bottom, each tom against the overheads, and finally, room mics against the entire mix. Small position adjustments often solve phase problems more effectively than simply flipping polarity.
Building Your Stereo Image
Creating a natural stereo picture requires understanding how drums are typically heard. Most engineers pan drums from the audience perspective - hihat slightly left, floor tom right, with the kick and snare anchored in the center. Room microphones generally go hard left and right to create maximum width.
Your overhead panning affects the entire kit's presentation. Try this approach: pan overheads left and right, then adjust tom panning to match their position in the overhead image. This creates a consistent, natural stereo field that translates well across different playback systems.
Mixing & Post-Processing

Converting raw drum tracks into a polished, professional sound requires careful processing and an understanding of how different elements interact. Let's explore the essential techniques that turn good drum recordings into great ones.
Foundation of EQ
Start with your kick and snare - they form the backbone of your mix. For kick drums, a gentle cut around 300-400 Hz can remove boxiness, while a boost at 60-80 Hz adds weight. The key frequencies for attack typically live between 3-5 kHz. Rather than boosting broadly, try narrow cuts to remove problematic frequencies first.
Snare drums often benefit from strategic EQ in three regions: low-mid body (200-300 Hz), crack and presence (3-5 kHz), and air (8-10 kHz). Listen for resonant frequencies that ring out unnaturally and reduce them with narrow cuts. Remember that your EQ decisions should support the song's style - a jazz snare needs very different treatment than a rock snare.
Compression Techniques
Each drum requires its own compression approach. Kick drums typically respond well to moderate compression (4:1 ratio) with slower attack times to preserve the initial transient. Set your release time to match the drum's natural decay - usually between 100-200ms for kicks.
Parallel compression adds power without sacrificing dynamics. Send your drum bus to an auxiliary track, compress it heavily (8:1 or higher), then blend it back under the original. This technique works particularly well on room mics, adding excitement and energy while maintaining the natural drum sound.
Advanced Processing
Gating can clean up bleed (unwanted sound from other drums) between microphones, particularly useful on toms. A gate is like a smart volume control that only lets sound through when it's loud enough to cross a threshold (like when the drum is hit). Set your gate threshold just above the bleed level, with a fast attack and release timed to the drum's natural decay. Modern DAWs often include multiband gates (gates that can listen for specific frequencies), allowing you to trigger them only from specific frequency ranges.
Sample reinforcement (the practice of blending recorded drum hits with pre-recorded samples) has become standard practice in many genres. Layer samples thoughtfully - they should reinforce your live drums, not replace them. Use phase-aligned samples (samples perfectly synchronized in time with your recorded hits to prevent that hollow, weak sound) and adjust their timing to match your recorded hits perfectly.
Common Mistakes & Troubleshooting

Recording drums inevitably presents challenges, even for experienced engineers. Understanding how to identify and solve common problems will save you countless hours of frustration.
Identifying Phase Problems
When your drums sound thin or hollow despite proper levels, phase cancellation is likely the culprit. This often manifests as weak low frequencies or a disconnected sound between close and overhead mics. To troubleshoot, start by soloing pairs of microphones - kick in/out, snare top/bottom, overheads together. The relationship between microphones should strengthen the sound, not weaken it.
If you discover phase issues during mixing, several approaches can help. Time-aligning tracks digitally can resolve subtle timing differences between mics. Sometimes, simply adjusting microphone distances by small amounts yields better results than digital solutions. For overheads specifically, ensure they remain equidistant from the snare to maintain proper center imaging.
Managing Cymbal Bleed
Excessive cymbal sound in your tom microphones can ruin an otherwise perfect drum track. Beyond careful mic positioning, several mixing techniques can help. Try using expanders rather than gates - they offer more natural control over decay times. High-shelf EQ cuts on tom mics can reduce harsh cymbal frequencies while preserving the fundamental tom sound.
Room Problems
Poor room acoustics often reveal themselves in hollow-sounding recordings or excessive early reflections. Strategic positioning becomes crucial here. Sometimes moving the kit just a few feet can dramatically improve the sound. If your room presents serious problems, consider creating a makeshift booth using moving blankets or even recording in a different space entirely.
Signal Quality Issues
Clean signal flow is essential for professional results. Crackling, buzzing, or intermittent dropouts often indicate cable problems or ground issues. Maintain a detailed signal chain diagram and keep spare cables handy. Ground loops can be particularly troublesome with multiple pieces of equipment - try connecting all your gear to the same power circuit to minimize potential problems.
Genre-Specific Setups

While mixing techniques vary significantly across genres, drum recording fundamentals remain largely consistent. What changes is how we prioritize different elements of the kit and what we emphasize in the final sound. Here's a more nuanced approach:
Jazz Recording
Traditional jazz often emphasizes the natural interaction between drums and cymbals. While a minimalist overhead-focused setup can work beautifully, many modern jazz recordings use full multi-mic setups with careful attention to phase relationships. The key difference lies in microphone positioning and gain staging to capture full dynamic range rather than maximum isolation.
Rock and Metal
Modern rock and metal recordings typically employ full multi-mic setups, but the approach varies widely based on subgenre. While some metal producers seek maximum isolation for heavy processing, others (especially in progressive or alternative rock) might prioritize capturing natural kit interaction. Room sound plays a crucial role - from completely dry for some metal to heavily featured in alternative rock.
Pop and R&B
Contemporary pop spans a wide range of drum sounds, from heavily processed to notably natural. The emphasis lies more on consistency and control in the recording phase. Multiple options for kick and snare are common, not because they're always needed, but to provide choices during mixing.
Hip-Hop
While early hip-hop often used minimal mic techniques to capture break-beat style drums, modern hip-hop employs varied approaches. Some tracks feature heavily processed single-mic recordings, while others use full multi-mic setups. The defining factor is often the role of the drums in the specific track rather than genre conventions.
Folk and Acoustic
These genres don't necessarily demand simpler setups. Many modern folk productions use detailed multi-mic approaches while choosing to maintain a natural sound through careful mixing. The distinction lies in the end goal rather than the recording technique.
The key is understanding that genre influences how we use our recordings more than how we capture them. Professional engineers often use similar recording setups across genres, then shape the sound during mixing to suit the style.
Recommended Equipment
The right gear choices can significantly impact your recording quality. While great records can be made with modest equipment, understanding which tools suit different scenarios helps you invest wisely. Here are carefully selected recommendations for different recording situations.
Minimal Setup (3-4 Microphones)
Your kick microphone should handle high SPLs while capturing low-end detail. The AKG D112 offers excellent low-frequency response and proven reliability. For overheads, the [Rode NT5 matched pair] or the sE Electronics sE8 stereo set delivers clean, detailed capture at a reasonable price point. A Shure SM57 rounds out this setup perfectly for snare recording, offering the industry-standard sound that's graced countless recordings.
Standard Studio Setup (8-10 Microphones)
Build on the minimal setup by adding dedicated tom microphones. The Sennheiser MD421-II excels on toms with their rich tonality and solid off-axis rejection. For room mics, two AKG C414 XL II captures outstanding detail and allows multiple polar patterns for different room techniques. The Subkick adds that coveted sub-bass thump to your kick drum sound.
Professional Multi-Mic Setup
When building a comprehensive mic locker, include specialized tools. The Neumann KM184 stereo pair offers exceptional overhead clarity. The Beyerdynamic M88 gives you a different kick drum flavor, emphasizing punch and attack. Consider the Telefunken M80 for snare, offering enhanced presence and top-end air compared to standard dynamic mics.
Essential Accessories
Quality stands prevent headaches during long sessions. The K&M series offers rock-solid reliability. Invest in high-quality XLR cables from Mogami or Canare - they'll outlast cheaper alternatives and provide better shielding. A good headphone amplifier like the PreSonus HP4 gives drummers clean, reliable monitoring options.
Frequently Asked Questions
What's the minimum setup I need to record drums professionally?
A professional drum recording is possible with as few as three microphones. Focus on a good kick microphone, a snare microphone, and one overhead. The Glyn Johns technique proves that even major records can be made with minimal setups. The key is proper microphone placement and a well-tuned kit in a decent room.
How do I deal with a challenging room?
Start by identifying what makes the room challenging. For small, boxy rooms, try positioning the kit diagonally to avoid parallel wall reflections. Use soft materials like moving blankets to control early reflections. Sometimes embracing the room sound and using fewer microphones yields better results than fighting against the acoustics with complex mic setups.
Should I compress drums while recording?
Generally, it's better to record drums without compression unless you're absolutely certain about the sound you want. Subtle compression on individual drums can help control peaks, but keep it gentle - aim for 2-3dB of gain reduction at most. Save more aggressive compression for mixing when you have better control and the ability to undo decisions.
My tom microphones pick up too much cymbal sound. How can I fix this?
This common problem requires a combination of solutions. Position tom mics at steeper angles to reject cymbal bleed. Use microphones with tighter pickup patterns. During mixing, gates or expanders can help, but the real solution starts with careful microphone placement during recording.
How important is the drummer's performance versus the technical setup?
A great performance on a modest setup will always sound better than a poor performance captured with expensive gear. Spend time getting the drums tuned properly and the drummer comfortable. Technical perfection means nothing if the performance lacks feel. Consider doing several complete takes rather than relying on extensive editing.
Glossary of Recording Terms
Bleed: Unwanted sound from nearby drums or cymbals picking up in a microphone intended to capture a specific drum. Common with tom microphones picking up cymbal sounds.
Dynamic Range: The difference between the quietest and loudest parts of a drum performance. Important when setting recording levels and using compression.
Gate/Gating: A tool that acts like a smart volume control, automatically silencing a track when the sound drops below a set level. Used to reduce bleed between drum microphones.
Phase Coherence: When multiple microphones capture the same sound source and work together instead of fighting each other. Poor phase coherence results in thin or hollow drum sounds.
Sample Reinforcement: The practice of blending pre-recorded drum samples with your live drum recordings to enhance consistency and power.
SPL (Sound Pressure Level): The strength or loudness of a sound wave. Important when choosing microphones for drums due to their loud nature.
Threshold: The level at which a gate or compressor starts working. For gates, any sound above this level passes through; below it gets silenced.
Transient: The initial attack or hit of a drum. Important when setting compressor attack times and choosing microphones.
Gain Staging: Setting optimal signal levels through each part of the recording chain, from microphone to preamp to recording software.
ORTF: A specific stereo microphone technique using two microphones angled 110 degrees apart and spaced 17cm, designed to capture a natural stereo image.
Near-field Room Mics: Microphones placed 6-8 feet from the drum kit to capture a blend of direct sound and room ambiance.
Polar Pattern: How a microphone captures sound from different directions. Common patterns mentioned include cardioid (heart-shaped pickup) and figure-8 (picks up from front and back).
Conclusion
Recording drums is both an art and a science - a journey that rewards patience, experimentation, and attention to detail. While this guide covers extensive technical ground, remember that these are starting points rather than rigid rules. The best recordings often come from understanding the fundamentals deeply enough to know when and how to break them.
Start simple. Before adding more microphones or processing, make sure you can capture a great sound with just a few well-placed mics. Focus on getting the source right - a well-tuned kit in a good room will always outperform a poor setup with expensive gear. Your ears are your most valuable tools - trust them over conventional wisdom when something sounds right.
Take time to experiment with different techniques and setups. Every drum kit, room, and musical style presents unique challenges and opportunities. Document what works and what doesn't. Learn from your mistakes - they're often the best teachers in audio engineering.
Most importantly, keep the music in mind. Technical perfection means nothing if it doesn't serve the song. Sometimes the 'wrong' approach yields exactly the right feeling. Great drum sounds support great performances - they don't overshadow them.
For continued learning, explore the work of legendary recording engineers through their recordings and interviews. Study different genres and their drum recording aesthetics. Connect with other engineers and share experiences. The journey of recording drums never really ends - there's always something new to discover and master.
About the authors
S. Jino is an accomplished multi-instrumentalist and music producer based in Kolkata, India, distinguished by his self-taught mastery and unique blend of technical acumen and musical performance. His extensive experience was forged through hands-on dedication, starting with the full restoration of a broken guitar. Jino's capabilities span keyboards, pedals, and advanced digital production, reflecting a comprehensive skill set developed independently. As a significant contributor to the music scene, Jino regularly performs with worship bands and college ensembles. He has also established himself as a reliable and authoritative professional in freelance mixing, mastering, and original music creation. Inspired by the innovative sounds of Brian May and David Gilmour, and influenced by Kolkata's vibrant metal community, Jino is committed to the intricate art of vintage gear restoration and the continuous exploration of music and technology fusion. His current professional setup, featuring a meticulously restored nameless guitar, a Fender Player Strat, and a Boss Katana 50. Read more