
By Gear Experts
Table of Contents
Equipboard
Equipboard is the world's largest community of artists and their gear. Read our review process.
We are reader-supported. When you buy through links on our site, we may earn an affiliate commission. Learn more.
"Your tracks are distorting even though no meters show red. Your mix sounds clean in the DAW but turns muddy on export. Each time you add another plugin, your sound quality mysteriously degrades. The solution to all these problems? Proper gain staging."
Clean, professional sound starts with understanding how your audio signal flows through each piece of equipment in your chain. This comprehensive guide demystifies gain staging – the crucial yet often overlooked foundation of great audio. Whether you're recording guitar, mixing vocals, or performing live, you'll learn practical techniques to maintain optimal signal levels at every stage, ensuring maximum clarity and minimum noise.
What Is Gain Staging?
Think of your audio signal as a wave traveling through different pieces of equipment. Each piece of gear in your signal chain - from instruments to speakers - has an optimal operating level where it sounds its best. When the signal is too strong, it distorts; too weak, and it becomes noisy. Gain staging is the art of maintaining this perfect signal level at every step.
In professional audio, proper gain structure means your signal is strong enough to minimize noise but controlled enough to prevent distortion. It's about finding that sweet spot where each piece of equipment in your chain receives exactly the level it needs to perform optimally.
For instance, a vocal recording chain might start with a microphone capturing sound, flowing through a preamp, then an audio interface, and finally into your recording software. At each of these points, the signal level needs to be carefully managed. Think of it like a relay race - each runner needs to receive the baton (your audio signal) at the right moment and with the right momentum for a successful handoff.
Understanding gain staging is crucial because problems at any point in this chain will affect everything that follows. Just as you can't fix a blurry photo by sharpening it later, you can't truly fix a poorly gain-staged signal with processing afterward.
Why Gain Staging is Essential
Improper gain staging can lead to various issues, including excessive noise and unwanted hum, distorted or clipped signals, weak or inconsistent sound, and a poor signal-to-noise ratio, all of which can make a mix sound unprofessional. By mastering gain staging, you can enhance your tone and improve sound clarity in both live and studio environments.
The Importance of a Balanced Signal
Proper gain staging starts with a clean and strong signal. This minimizes unwanted noise, preserves a greater dynamic range and ensures a balanced mix without sudden level spikes. Maintaining an optimal signal-to-noise ratio (SNR) is crucial, as too much gain can cause distortion, while too little can introduce noise and unwanted artifacts.
Understanding Analog vs. Digital Gain Staging
When setting gain, a vintage Neve preamp and a modern DAW behave fundamentally differently. In professional audio, these differences shape how we approach gain staging across our signal chain. Analog circuits and digital systems process audio signals in distinct ways, directly impacting how we manage levels in each domain.
Analog: The Forgiving Friend
In the analog realm, pushing signal levels into saturation can actually enhance your sound. Take the case of a tube amplifier - as you increase the input level, it gradually adds harmonics and compression, creating that warm, musical character we associate with vintage gear. This natural saturation is why many engineers still rely on analog equipment for tonal shaping.
Analog equipment offers generous headroom, meaning it can handle signal levels well above its nominal operating level without harsh distortion. When you push an analog console or tape machine, it responds with a gradual, musical compression that often enhances the source material. This forgiving nature makes analog gain staging more flexible and often more creative.
Digital: The Precise Perfectionist
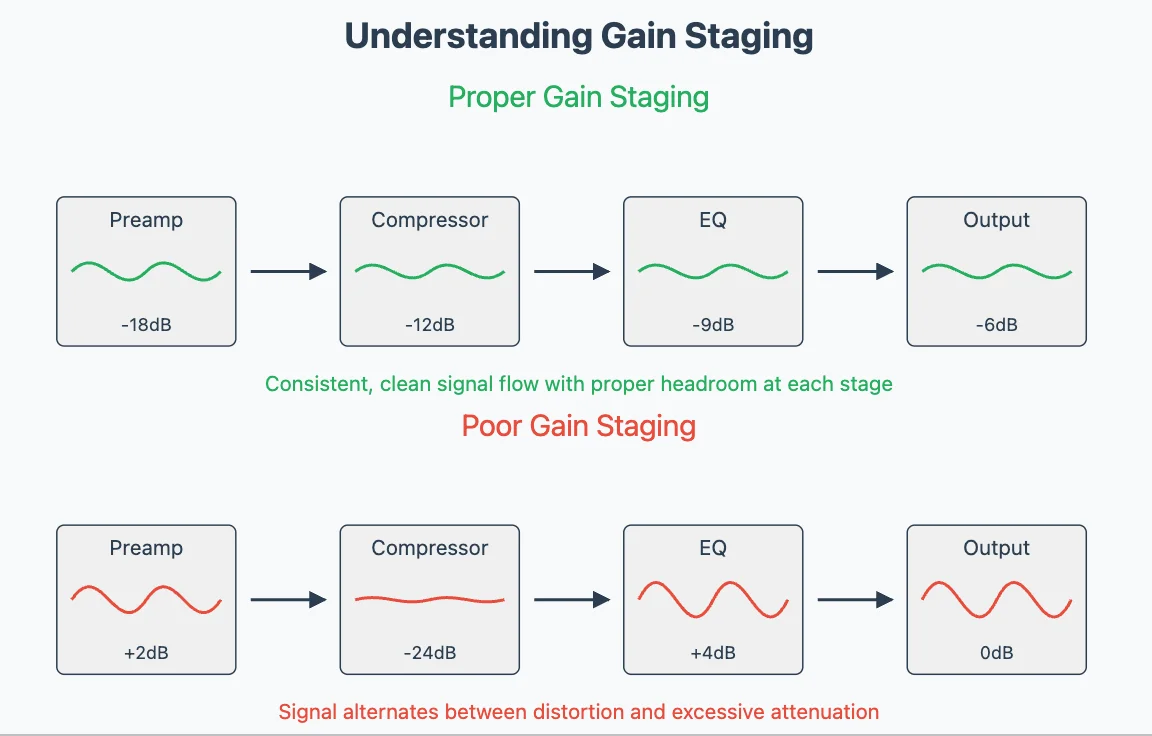
Digital audio operates with mathematical precision. Unlike analog's gradual saturation, digital systems have an absolute ceiling - 0 dBFS (decibels Full Scale). Exceed this limit, and your audio immediately clips, creating harsh, unpleasant distortion that's impossible to undo.
Professional engineers typically keep digital levels between -18 dBFS and -12 dBFS during recording and mixing. This provides ample headroom for dynamic content and prevents any risk of clipping. Think of it like driving a car - while analog gear lets you comfortably cruise at different speeds, digital audio has a strict speed limit that should never be exceeded.
The Basics of Gain Staging in Live & Studio Setups
Whether you're performing live or recording in a studio, proper gain staging principles remain the same, but their application differs significantly based on your environment. Let's break down specific approaches for both scenarios.
Live Performance Gain Staging

Live sound brings unique challenges to gain staging. Your signal has to travel through a complex chain of equipment while maintaining clarity and staying feedback-free. From your instrument through pedals, amps, and finally to the PA system, each connection point needs careful attention to ensure your tone stays intact and powerful.
Setting Levels on Pedals & Amps
Start with your pedals. Each effect pedal should maintain unity gain - meaning the signal level stays consistent whether the pedal is on or off. When setting amp gain, start with a clean tone and gradually increase until you achieve the desired amount of natural overdrive.
Managing Pedal Chain Noise
High-gain pedals like distortions and fuzzes generate noise. Place these earlier in your chain where the signal is strongest. For particularly noisy setups, a noise gate between your last drive pedal and your modulation effects can significantly clean up your signal. Modern noise gates offer precise threshold controls - start with a conservative setting and adjust until you find the sweet spot between noise reduction and natural decay of your notes.
Working with Live Mixers and PA Systems
Your signal should hit the mixer's preamp at an optimal level - typically peaking between -6dB and -12dB. This gives the sound engineer enough headroom to work with. Always use high-pass filters on instruments that don't need low frequencies. This reduces stage rumble and keeps your mix cleaner. During soundcheck, test your loudest playing dynamics to ensure your signal won't clip during the performance.
Recording Studio Gain Staging

Studio recording requires precise gain staging to capture the cleanest possible signal. Unlike live situations where some noise might be masked by the environment, studio recordings reveal every flaw in your gain structure. Moreover, you need to maintain proper headroom for mixing and mastering later in the production process.
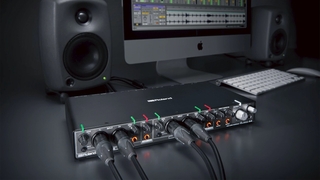
Interface and Preamp Settings
When recording, set your preamp gain so the loudest parts peak around -6dB on your interface meters. This provides clean audio with enough headroom for dynamic performances. Monitor your input levels constantly during recording - a clip-free sound check doesn't guarantee clip-free takes. For instruments with wide dynamic ranges like drums or vocals, consider using a compressor before your interface to help control peaks while maintaining a strong average level.
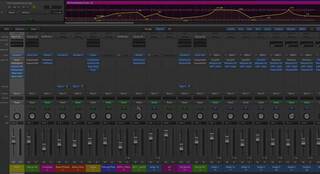
DAW Level Management
Keep your recorded tracks between -18dB and -6dB. This range gives you plenty of headroom for processing while maintaining a strong signal above the noise floor. Pay attention to your meters not just on individual tracks, but on busses and the master output as well. Many DAWs offer different metering options - peak meters show instantaneous levels while RMS meters give you a better sense of average loudness. Use both to make informed decisions about your levels.
Plugin Gain Staging
Each plugin in your chain needs proper gain staging. If you're hitting a compressor or EQ too hot, you're not getting its optimal performance. Watch for any significant level changes when bypassing plugins - this often indicates a gain staging issue that needs addressing. Pay special attention to gain-based effects like saturation or tape emulation plugins, as these can dramatically affect your signal level. Remember that digital plugins often emulate analog behavior - some are designed to be hit hard for character, while others need careful level management for clean operation.
Understanding Headroom & Signal-to-Noise Ratio
Headroom represents the available space between your signal's peak level and the point of clipping (0 dBFS in digital systems). Professional engineers typically maintain at least 6dB of headroom on individual tracks and even more on busses and the master output.
Signal-to-noise ratio (SNR) is equally important - it's the relationship between your desired signal and the noise floor. Setting proper gain helps maintain a healthy SNR. If your levels are too low, you'll need to apply more gain later, which brings up both the signal and any noise. Conversely, if you're too close to clipping, you risk distortion. The sweet spot lies in recording hot enough to capture detail while leaving enough headroom for processing.
This balance between headroom and SNR influences every gain decision in your recording chain. From choosing mic placement to setting plugin thresholds, maintaining this balance ensures clean, professional-quality recordings with maximum dynamic range and minimum noise.
Common Mistakes in Gain Staging (And How to Fix Them)
Even experienced audio engineers can fall into these gain staging traps. Here are the most frequent issues you'll encounter and their solutions.
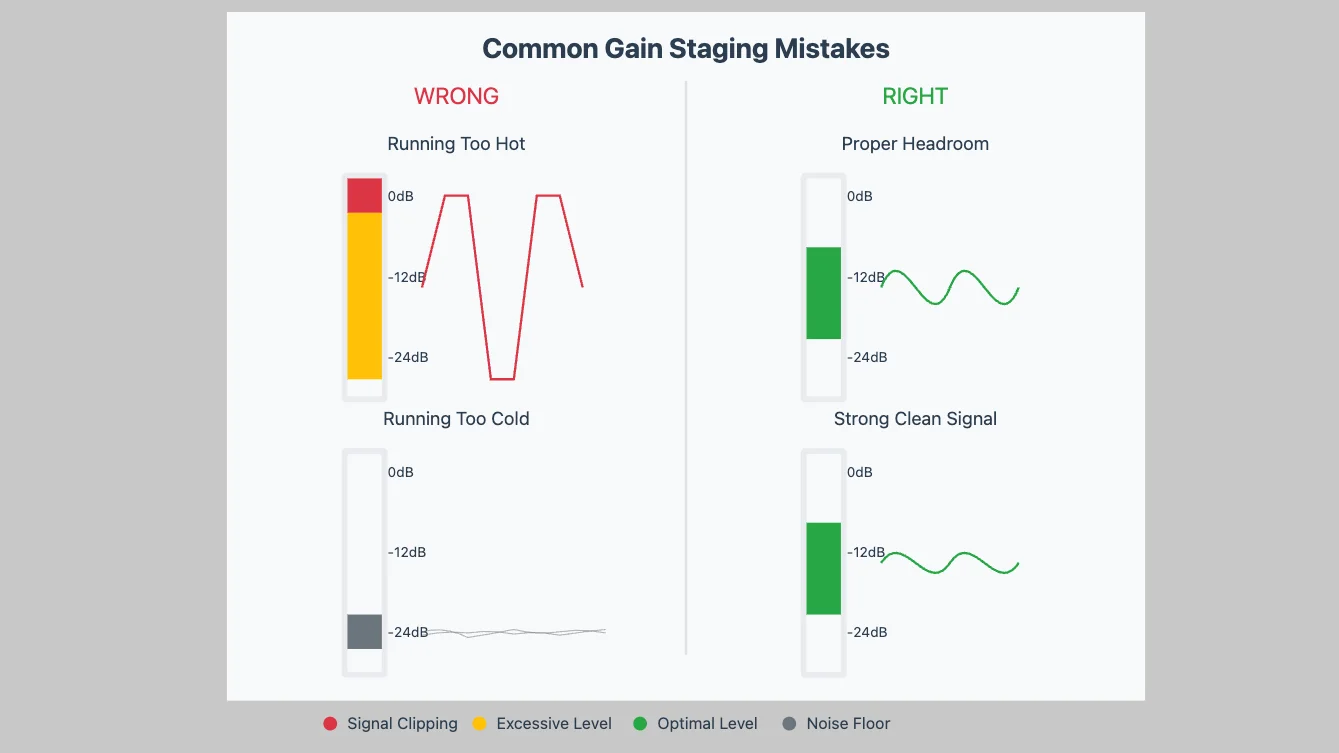
Overdriving Early Stages
Hitting your first preamp or pedal too hard might seem like a good way to get a fatter sound, but it creates problems that cascade through your entire chain. When your signal clips early, each subsequent device receives a distorted signal to process. The result? Muddy, unclear sound that no amount of EQ can fix. To solve this, start with conservative gain settings early in your chain. You can always add controlled saturation later, but you can't undo clipping.
Running Too Cold
A timid approach to gain staging often leads to weak, noisy recordings. When your initial signal is too quiet, you'll need to apply more gain later to compensate. This brings up both your signal and any noise along with it. The fix is straightforward: set proper gain at the source. Monitor your levels to ensure a strong signal that stays well above the noise floor while avoiding peaks that could clip.
Mismatched Pedal Levels
Your tone suddenly disappears when you kick in that cool new effect - this is a classic case of unbalanced pedal gain. Each pedal in your chain should maintain relatively consistent volume whether it's on or off. To address this, use each pedal's output level control to match its bypassed signal level. Pay special attention to drive pedals and modulation effects, as these often cause the biggest level jumps.
Digital Peaking
Unlike analog gear that can add pleasing saturation when pushed, digital systems are unforgiving with clipping. Many DAW users ignore their meters until they hear obvious distortion, but by then the damage is done. The solution requires discipline: keep your peaks below -6dB throughout your digital signal path. This includes individual tracks, busses, plugins, and your master output.
Practical Guide to Gain Staging
Every piece of equipment in your signal chain needs to be gain-staged properly for optimal sound quality. While the core principles remain the same, each instrument and recording scenario requires specific techniques. Let's explore detailed approaches for common recording situations.
Guitar & Bass Setup

Electric guitars and basses present unique gain staging challenges due to their complex signal chains involving pedals, preamps, and amplifiers. Proper gain staging here not only affects your tone but also impacts noise levels and dynamic response.
Starting with the Source
Begin at your instrument's output. Active pickups should provide strong, clean signals around 500mV to 1.5V. Check battery health as low batteries can reduce output and increase noise. Set pickup height for balanced string response - too close causes magnetic drag and potential overload, too far weakens the signal requiring excess gain later.
Pedal Chain Management
Setting proper gain through your pedal chain requires methodical attention. Start with drive pedals as they're most sensitive to input level. Each pedal should maintain consistent volume when bypassed - use their output controls to match levels. Long pedal chains can degrade your signal significantly, which is why many professional guitarists use buffer pedals. Place a high-quality buffer at the start of your chain, especially when running more than 5-6 pedals or long cable runs. This maintains signal integrity and preserves your high frequencies.
Amplifier Gain Structure
Modern amps typically feature preamp and power amp (master) volume controls. The preamp section shapes your tone and distortion character, while the power amp section determines the overall volume. Set your amp gain to achieve natural dynamics - you should hear clear difference between soft and hard playing. Using master volume helps you maintain your tone at different volumes without losing the sweet spot of your preamp gain staging. Remember, gain isn't just about distortion - it's about maintaining control and clarity throughout your signal path.
Vocals & Microphones

The path from microphone to recording requires careful gain staging at each step. Clean vocal recordings start with proper gain structure, well before any processing.
Preamp Gain Setting
Your preamp is crucial for capturing strong, clean levels without introducing noise or distortion. Set mic preamp gain while monitoring peaks - aim for -12dB on loud passages to leave headroom for dynamics. Listen carefully for any hint of distortion on plosives or loud notes, as these can be impossible to fix later.
Compression Techniques
When using compression on vocals, gain staging becomes even more critical. Apply gentle compression after your preamp to control dynamics without squashing the performance. Monitor the compressor's input and output levels carefully - you want gain reduction working on peaks while maintaining the natural character of the voice.
Synths & Keyboards

Synthesizers and keyboards present unique gain staging challenges, especially when dealing with multiple layers and effects. Your goal is to maintain clarity while preserving the character of each sound.
Managing Multiple Layers
Modern synth patches often combine multiple oscillators and layers. Each layer needs its own gain adjustment to blend properly. Start with your primary sound at a moderate level, then bring in additional layers carefully. Pay special attention to bass frequencies - layered sounds can quickly build up in the low end, eating up headroom.
Effects Processing
Synths often use extensive effects chains. Monitor levels between each effect, especially with resonant filters or heavy modulation. Virtual analog effects can saturate in pleasing ways, but digital effects need careful level management to prevent harsh distortion. When using external effects, match the synth's output level to the effect unit's expected input level.
Virtual Instrument Levels
With software synths, keep an eye on your DAW's meters. Many virtual instruments output hot signals by default. Adjust the instrument's master output to sit comfortably in your mix without requiring excessive channel fader moves. Check your levels when switching presets, as they can vary significantly in volume.
Recording & Mixing
Proper gain staging in the recording and mixing phase ties everything together. This is where precision becomes crucial for achieving professional results.
Interface Input Gain
Set your audio interface's input gain with future processing in mind. A good target is peaks around -6dB on your interface meters. This leaves enough headroom for processing while keeping signals well above the noise floor. Monitor your inputs consistently during recording - levels can change as performers get more energetic.
Mix Level Management
Keep your tracks at moderate levels through the mixing process. Avoid boosting or cutting channel faders dramatically - if you need large changes, address the source gain instead. Watch your mix bus levels carefully, maintaining headroom for mastering. Use gain plugins at the start of your processing chains to set optimal levels for each plugin.
Software Effects
Each plugin in your chain should receive appropriate input levels. Some plugins emulate analog hardware and expect specific input ranges to perform correctly. Pay attention to level changes when bypassing effects - significant changes often indicate gain staging issues that need addressing.
Advanced Gain Staging Techniques
Moving beyond the basics, advanced gain staging opens up creative possibilities while maintaining technical excellence. These techniques help you shape tone, control dynamics, and achieve professional sound quality.
Creative Gain Staging
Professional engineers often use gain staging as a sound-shaping tool, especially with analog gear. Transformers and tubes respond differently at various input levels. Try feeding a tube preamp just hot enough to achieve subtle saturation without obvious distortion. With analog consoles, pushing different channels harder can add character - some channels might handle bass well, while others excel with midrange sources.
Working with High-Gain Setups
High-gain scenarios require extra attention to gain staging. For guitar rigs, cascading gain stages create rich harmonics but can easily spiral into noise and feedback. Start with moderate gain at each stage rather than maxing out any single component. This approach gives you better control over the final tone.
Parallel Processing
Parallel processing has become a staple of modern mixing, where you blend a processed version of a signal with its original. Getting the gain staging right here is crucial because you're effectively creating multiple versions of the same source that will eventually be summed together. A common example is parallel compression, where even small gain differences between the dry and compressed signals can dramatically affect the final sound.
When using parallel compression, set your dry signal at a moderate level, then blend in the compressed signal to taste. Monitor the combined output carefully - parallel paths can cause unexpected peaks. The same principle applies to any parallel effects like distortion or modulation.
Frequently Asked Questions
What's the Difference Between Gain and Volume?
While often confused, gain and volume serve different purposes. Gain controls the input level of a signal and directly affects its tone by determining how much signal enters the next stage. Volume, on the other hand, controls the output level without altering the tonal characteristics of the sound.
How Do I Know If My Gain Staging is Correct?
Your signal should be clear, strong, and free from unwanted distortion or noise at every stage of your signal chain. Use VU meters, peak meters, and RMS meters to ensure proper levels. Professional engineers typically aim for healthy headroom, around -18dBFS in digital recording. Trust your ears as well - if you hear distortion or noise, revisit your gain structure.
Can I Fix Bad Gain Staging in Mixing?
While some issues can be adjusted during mixing, it's always better to set proper gain staging at the source. Poor gain staging often introduces unwanted noise, distortion, or weak signals that become baked into your recordings. These problems become much harder to address later in the mixing process.
What Happens If My Gain is Too High?
When your gain is too high, your signal may clip, leading to distortion and loss of clarity. In digital systems, this clipping is particularly harsh and unpleasant. While analog clipping can sometimes add desirable warmth, it should still be controlled and intentional rather than accidental.
What Happens If My Gain is Too Low?
A low gain setting may cause your signal to be too quiet, requiring excessive boosting later in the chain. This additional amplification brings up both your signal and any noise in the system, potentially reducing the overall quality of your sound.
How Do I Set Proper Gain Staging in a DAW?
Start by recording with levels peaking around -18dBFS to -12dBFS to allow proper headroom. Check gain structure across all plugins to avoid clipping at any stage. Instead of pushing the master output, adjust levels using trim, faders, or gain plugins to maintain clean headroom throughout your mix.
Should I Use a Compressor for Gain Staging?
Compression can help control dynamics, but it's not a substitute for proper gain staging. Always set your gain levels correctly first, then use compression for tone shaping and consistency. Think of compression as a creative tool rather than a fix for poor gain structure.
How Does Gain Staging Affect Effects Like Reverb and Delay?
Effects processors need proper input levels to function optimally. If your input levels are too high, effects like reverb and delay may sound oversaturated or distorted. Proper gain staging ensures these effects receive clean signals and perform as intended, resulting in more natural and professional-sounding processing.
How Do I Set Gain Staging for Live Performances?
Begin with the input gain on your mixer, ensuring no clipping occurs. Balance levels across all instruments and vocals before adjusting faders. Use your soundcheck effectively - test at performance volumes and monitor your meters while listening critically. A properly gain-staged live system provides clarity, punch, and minimal feedback risks.
Conclusion

Gain staging might seem technical, but it's fundamentally about getting the best possible sound at every step of your signal path. Whether you're a guitarist crafting tone through pedals and amps, a vocalist seeking pristine recordings, or a producer working in a hybrid analog-digital setup, proper gain staging is the foundation of professional sound.
The concepts we've covered - from basic level setting to advanced parallel processing - work together to create a clean, powerful signal chain. Start with the fundamentals: set appropriate levels at your sound source, maintain strong but clean signals through each piece of equipment, and leave enough headroom for processing. As you advance, experiment with creative gain staging techniques to develop your unique sound.
Remember that gain staging isn't just about avoiding technical problems - it's about maximizing the potential of your equipment and creating space for creativity. When your gain structure is solid, you can focus on the music rather than fighting with levels and noise.
About the authors
Juan Spinelli is a multi-instrumentalist musician, but more of a guitarist than anything else. Based in Buenos Aires, Argentina, he started playing at a very early age and learned various instruments such as flute, clarinet, percussion, didjeridoo, cavaquinho, bass and more. Today, he also works as a music producer and sound engineer, collaborating in several projects in his city and with artists from all over the world. Read more